Category: Desserts

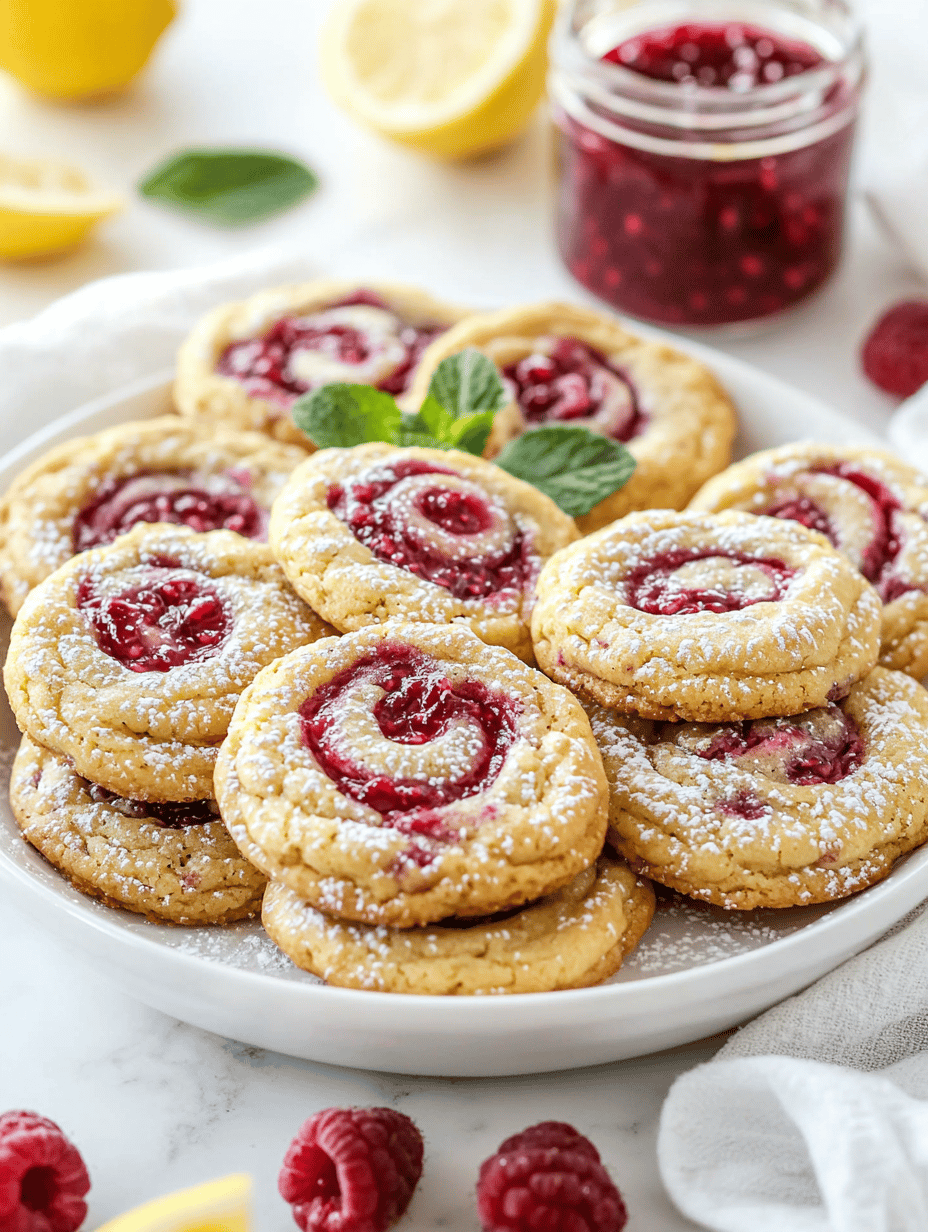
  • Lemon Raspberry Cookies: Flavors That Blink Bright in a World of Sweetness

    Lemon Raspberry Cookies: Flavors That Blink Bright in a World of Sweetness

    The Unexpected Dinner Table Escape

    Here’s the thing — I never really set out to bake cookies today. I was just craving something tart and bright after a long day staring at screens, something more like a jolt than a treat. And then I remembered how I used to steal berries from my grandma’s garden, they’d burst with this pure, under-the-skin jellyness, and her lemon curtains always smelled like sunshine.

    Today, that leftover zest combo seems to have found its way into my kitchen unintentionally. It’s funny how these cookies came to be—no plan, just a couple of ingredients that make you do a double-take when you bite into that tangy raspberry jam swirl with lemon pop. These aren’t the kind of cookies I’d bring to a fancy party; they’re a reminder that sometimes the best ideas hit you when you’re not looking.

    Lemon Raspberry Jam Swirl Cookies

    These cookies are baked with a tender, crumbly texture and feature vibrant raspberry jam swirls and hints of lemon zest. The dough is chilled before baking, resulting in a delicate appearance with a colorful, marbled interior and a slightly crispy edge. The final treat combines a sweet, tart, and citrusy flavor profile with a visually appealing swirl pattern.
    Prep Time 20 minutes
    Cook Time 15 minutes
    Total Time 35 minutes
    Servings: 12
    Course: Main Course
    Cuisine: American
    Calories: 150

    Ingredients
      

    • 1 cup unsalted butter softened
    • 1 cup granulated sugar
    • 1 large egg
    • 2 tsp lemon zest freshly grated
    • 2 1/2 cups all-purpose flour
    • 1/2 tsp baking powder
    • 1/4 tsp salt
    • 1/2 cup raspberry jam

    Equipment

    • Mixing bowls
    • Electric mixer or whisk
    • Baking sheet
    • Parchment paper
    • Rolling pin
    • Cookie cutter or knife

    Method
     

    1. In a mixing bowl, cream together the softened butter and granulated sugar using an electric mixer or whisk until light and fluffy, about 2-3 minutes. Scrape down the sides as needed.
    2. Add the egg and lemon zest to the bowl and mix until well combined, about 30 seconds. The mixture should become smooth and slightly glossy.
    3. In a separate bowl, whisk together the all-purpose flour, baking powder, and salt. Gradually add this dry mixture to the wet ingredients, mixing on low speed until just incorporated and a soft dough forms.
    4. Divide the dough into two equal portions. Wrap each in plastic wrap and chill in the refrigerator for at least 30 minutes to firm up.
    5. Preheat the oven to 350°F (175°C). Line a baking sheet with parchment paper. Remove one chilled dough portion and on a lightly floured surface, roll it into a rectangular sheet about 1/4 inch thick. Spread a thin layer of raspberry jam evenly over the surface.
    6. Starting from one edge, carefully roll the dough into a log or cut into circles with a cookie cutter. Place the cookies on the prepared baking sheet, spacing them about 1 inch apart. Repeat with the second dough portion.
    7. Bake in the preheated oven for 12-15 minutes, or until the edges are golden brown and the tops are set. Remove from oven and allow to cool slightly on the baking sheet before transferring to a wire rack.

    Notes

    Chilling the dough helps prevent spreading during baking and enhances flavor.

    Maybe they’re nostalgic or maybe just a happy accident — whatever, they’re powerfully real. Not too sweet, with a little zing that makes you pause mid-bork, wondering if you just found your new favorite cookie for the season. Guess I’ll find out tomorrow, but right now, I’m just glad some berries and citrus made it to my plate.

  • Turkish Apple Cookies: The Forgotten Snack We Nearly Missed

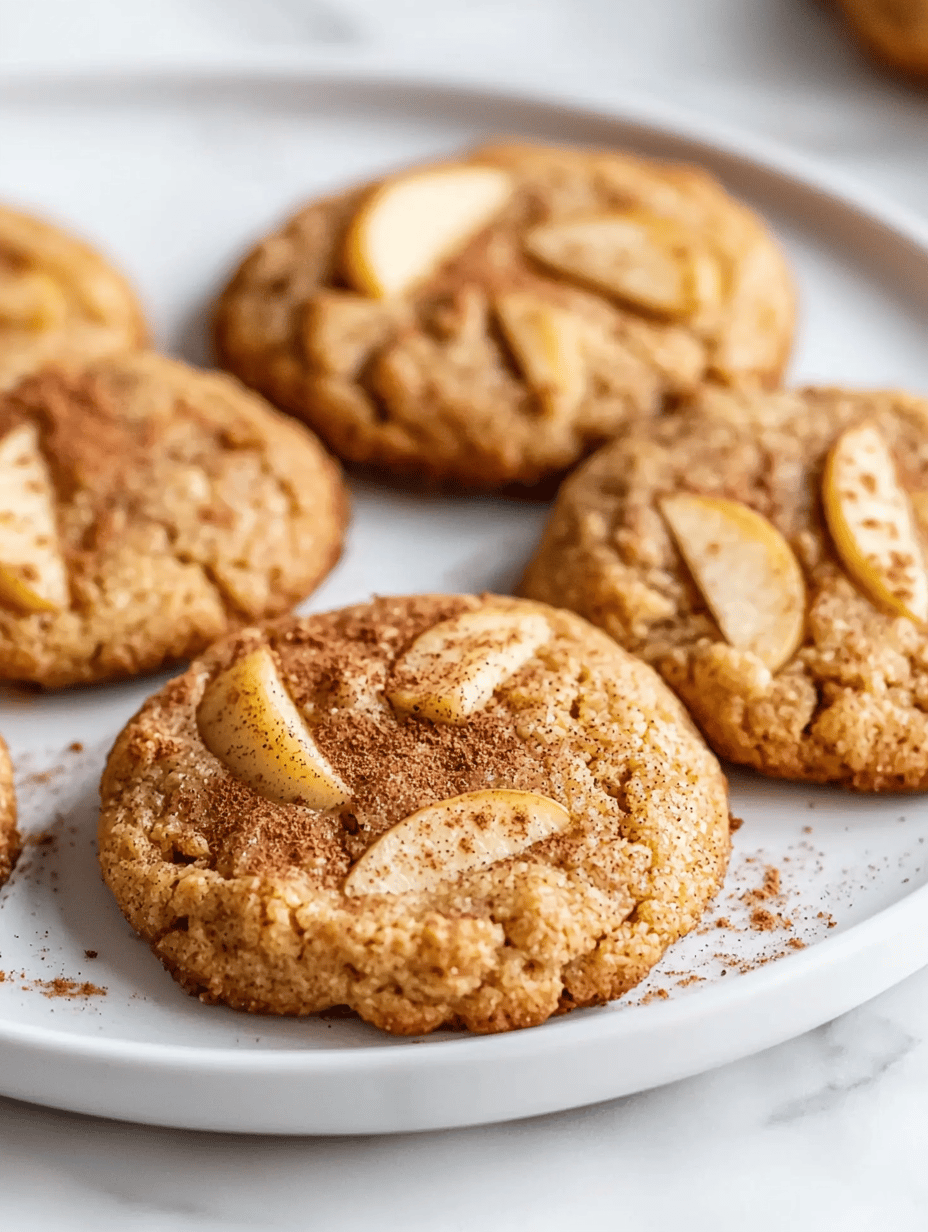
    Turkish Apple Cookies: The Forgotten Snack We Nearly Missed

    Just a moment of truth in the kitchen

    These cookies aren’t part of some elaborate baking tradition. No fancy ingredients. Just tart apples, a touch of sugar, and a handful of flour. I never expected how the raw scent of cooked apples would fill the air, sharp and sweet, like peeling back a moment from my childhood. It’s funny — I usually chase after flavors that shout louder. But these quietly sit there, whispering of crisp air and late summer orchards.

    Right now, with everything so complicated, these cookies remind me that sometimes the simplest things matter most. It’s not about perfection; it’s about the smell of apple and cinnamon clinging to your fingers. And honestly? I’ve been craving something that feels like it was meant to be part of a good, honest day, not a chore or show. Just a little something I keep thinking about, unprompted.

    Simple Apple Cookies

    These cookies are made with sliced tart apples, a small amount of sugar, and flour, baked until golden with a soft, tender interior and slightly crisp edges. They highlight the natural flavor of cooked apples combined with a subtle cinnamon aroma, resulting in a modest, rustic treat with a chewy texture.
    Prep Time 10 minutes
    Cook Time 20 minutes
    Total Time 30 minutes
    Servings: 8
    Course: Main Course
    Cuisine: Universal
    Calories: 150

    Ingredients
      

    • 2 medium tart apples peeled, cored, sliced
    • 0.5 cup sugar granulated
    • 1.5 cups all-purpose flour
    • 0.5 teaspoon cinnamon ground

    Equipment

    • Knives
    • Mixing bowl
    • Baking sheet
    • Parchment paper
    • Oven

    Method
     

    1. Preheat the oven to 350°F (175°C). Line a baking sheet with parchment paper.
    2. Combine the sliced apples, half of the sugar, and cinnamon in a mixing bowl. Toss until the apple slices are evenly coated and set aside to macerate for 10 minutes.
      2 medium tart apples
    3. In a separate bowl, whisk together the flour and remaining sugar until well combined.
      2 medium tart apples
    4. Add the apple mixture to the dry ingredients, gently folding until a dough forms. The mixture should hold together but remain slightly sticky.
      2 medium tart apples
    5. Using a spoon or cookie scoop, portion the dough onto the prepared baking sheet, flattening slightly with the back of the spoon. Bake for 18-20 minutes, until the edges are golden brown and the centers are soft.
      2 medium tart apples
    6. Remove from oven and let cool slightly. Serve warm or at room temperature, with the edges crisp and the interior tender and moist.

    Maybe I’ll never stop trying to recreate that smell of apples bubbling in sugar. Or maybe I’ll just keep chasing that fleeting feeling of a quiet afternoon. Either way, these cookies seem like they’ll prove to be a quiet rebel — simple but unexpected.

  • Key Lime Cookies: A Secret Ingredient Gets Them Talking

    Key Lime Cookies: A Secret Ingredient Gets Them Talking

    Why These Cookies Feel Special

    So, I was cleaning out my grandma’s old recipe box—usual dust, faded paper, a nostalgic smell of vanilla and lemon zest mixing together. Then I found this tiny, crumpled slip of paper with the words “Key Lime Cookies” scribbled hurriedly. It hit me—this was a relic, tucked away like a secret. No fancy ingredients, just butter, sugar, and that bright, tart juice. But there’s an electric crackle in the air when I bake them, like they’re whispering stories of summer evenings on heated porches.

    Right now, they feel like a quiet rebellion—simple but unexpectedly clever. Like life, sometimes what’s hidden in the old notes turns out to be the most surprising thing on the table.

    Key Lime Cookies

    These cookies are made by combining softened butter, sugar, and lime juice, then mixing in flour to form a dough. The dough is shaped into small rounds and baked until lightly golden, resulting in crisp edges with a tender, citrus-flavored interior that has a slightly crumbly texture.
    Prep Time 15 minutes
    Cook Time 12 minutes
    Total Time 27 minutes
    Servings: 24
    Course: Main Course
    Cuisine: American
    Calories: 90

    Ingredients
      

    • 1 cup unsalted butter softened to room temperature
    • 1 cup granulated sugar
    • 2 tablespoons fresh lime juice about 1-2 limes
    • 2 cups all-purpose flour
    • 0.5 teaspoon baking powder
    • 0.25 teaspoon salt

    Equipment

    • Mixing bowls
    • Electric mixer
    • Baking sheet
    • Parchment paper
    • Measuring cups and spoons
    • Silicone spatula

    Method
     

    1. In a large mixing bowl, combine the softened butter and granulated sugar using an electric mixer on medium speed until the mixture is pale and fluffy, about 2-3 minutes. Watch for a smooth, creamy texture and a slight sheen.
      1 cup unsalted butter, 1 cup granulated sugar
    2. Add the fresh lime juice to the butter-sugar mixture and mix until well incorporated, about 30 seconds. The mixture may look slightly curdled but will combine smoothly after a few seconds.
      2 tablespoons fresh lime juice
    3. In a separate bowl, whisk together the flour, baking powder, and salt. Gradually add this dry mixture to the wet ingredients, mixing on low speed or stirring with a silicone spatula until just combined and a dough forms.
      2 cups all-purpose flour, 0.5 teaspoon baking powder, 0.25 teaspoon salt
    4. Scoop tablespoon-sized portions of the dough and roll them into balls. Place the dough balls on a parchment-lined baking sheet, spacing them about 2 inches apart. Gently flatten each ball slightly with the bottom of a glass or your fingers.
    5. Bake the cookies in a preheated oven at 350°F (175°C) for approximately 12 minutes, or until the edges are lightly golden. The centers should still look soft but set.
    6. Remove the baking sheet from the oven and let the cookies cool on the sheet for 5 minutes. Then transfer them to a wire rack to cool completely, allowing their texture to firm up slightly.

    Nothing too fancy, just a reminder that some recipes carry stories that are worth digging up. And maybe I’ll save the last cookie for someone who’ll get the joke. Or maybe I’ll eat it all myself and pretend it’s a secret weapon against bad days.

  • Red Velvet Cake: The Unexpected Quiet Power of Its Rich Cocoa Depth

    Red Velvet Cake: The Unexpected Quiet Power of Its Rich Cocoa Depth

    I made this cake for my neighbor’s birthday. Took one bite and realized I’d been ignoring how much I love that deep, dark cocoa smell wafting up from the crumb. No overwhelming sweetness, just that muted, almost smoky warmth underneath the tangy cream cheese frosting. It’s not trendy or flashy. That’s what makes it perfect for right now. Everything’s loud—Instagram stories, tweets, everyone’s trying to outshine each other. But inside all that noise, I want this cake. It’s quiet. It’s real. It’s a reminder that sometimes, a simple, honest flavor can still make you pause and really taste something. I don’t think it needs a fancy topping—just a little extra glitter if you’re into it. Though honestly, I prefer it with no fluff, just a honest slice of velvet.

    Dark Cocoa Velvet Cake with Cream Cheese Frosting

    This cake features a deep, rich cocoa-flavored crumb with a fine, moist texture, achieved through careful mixing and baking. The dark chocolate notes are complemented by a tangy cream cheese frosting, resulting in a visually dark and tender interior with a smooth, creamy exterior layer.
    Prep Time 20 minutes
    Cook Time 35 minutes
    Total Time 55 minutes
    Servings: 8
    Course: Main Course
    Cuisine: American
    Calories: 450

    Ingredients
      

    • 1 and 3/4 cups all-purpose flour
    • 2 cups granulated sugar
    • 1/2 cup unsweetened dark cocoa powder
    • 1 and 1/2 teaspoons baking soda
    • 1 teaspoon baking powder
    • 1/2 teaspoon salt
    • 2 large eggs
    • 1 cup buttermilk
    • 1/2 cup vegetable oil
    • 2 teaspoons vanilla extract
    • 3/4 cup hot water
    • 8 oz cream cheese, softened
    • 1/2 cup unsalted butter, softened
    • 4 cups confectioners’ sugar
    • 1 teaspoon vanilla extract

    Equipment

    • Mixing bowls
    • Electric mixer
    • Cake Pans
    • Cooling rack
    • Offset Spatula

    Method
     

    1. Preheat the oven to 350°F (175°C). Grease two 9-inch round cake pans and line the bottoms with parchment paper. In a large mixing bowl, whisk together flour, sugar, cocoa powder, baking soda, baking powder, and salt until evenly combined.
    2. Add eggs, buttermilk, vegetable oil, and vanilla extract to the dry ingredients. Use an electric mixer on medium speed to beat until smooth and well incorporated, about 2-3 minutes. Gradually add hot water, mixing slowly to integrate fully; batter will be thin.
    3. Divide the batter evenly between the prepared cake pans. Tap the pans gently on the counter to release air bubbles. Bake in the preheated oven for 30-35 minutes, or until a toothpick inserted into the center comes out clean. The edges should be slightly pull away from the pan.
    4. Remove the cakes from the oven and allow them to cool in the pans for 10 minutes. Then, transfer to a wire cooling rack and cool completely before frosting.
    5. In a separate bowl, beat the softened cream cheese and butter together until smooth and creamy, about 2 minutes. Gradually add the confectioners’ sugar, one cup at a time, beating well after each addition. Mix in vanilla extract and continue until frosting is fluffy and spreadable.
    6. Once cakes are completely cooled, spread a layer of cream cheese frosting on top of one layer. Place the second cake layer on top and apply a thin crumb coat. Chill for 15 minutes, then apply the remaining frosting evenly over the top and sides of the cake. Decorate as desired.

    And maybe that’s what matters most right now. That moment when a bite unexpectedly settles in, quiet and true. Might not be what everyone’s chasing—probably not. But I think I’ll keep this version. A little less loud, a little more real.

  • The Forgotten Art of Making Sponge Cake with a Twist

    The Forgotten Art of Making Sponge Cake with a Twist

    Revisiting Simplicity

    It’s funny how a simple whisk and some eggs can suddenly make me feel like a kid again. No fancy gadgets, no complicated steps. Just that faint smell of vanilla and warm oven air filling the tiny kitchen. I’ve realized lately that sponge cake isn’t just about the fluffy layers, but about memory—those lazy Sunday mornings and birthdays long gone. It’s a dance of air and heat, like catching a breath of pure, airy sweetness that somehow makes everything slower, softer, better. Weird thing is, with sugar and eggs, I think I’ve been chasing *this* feeling, not just the cake. Now, with a dash of lemon zest, it feels like rediscovering an old friend in the most unexpected way—something familiar, yet new enough to surprise even me.

    Lemon Vanilla Sponge Cake

    A light and airy sponge cake made by gently folding whipped eggs and sugar, combined with flour and vanilla for flavor, then baked until golden. The addition of lemon zest provides a bright aroma and subtle citrus flavor, with a tender, crumbly texture when baked. It showcases the delicate aeration achieved through careful folding and gentle heat exposure.
    Prep Time 15 minutes
    Cook Time 25 minutes
    Total Time 40 minutes
    Servings: 8
    Course: Main Course
    Cuisine: European
    Calories: 180

    Ingredients
      

    • 4 large eggs room temperature
    • 150 g granulated sugar
    • 1 tsp vanilla extract
    • 200 g all-purpose flour sifted
    • 1 tsp baking powder
    • zest of 1 medium lemon finely grated
    • 1 tbsp butter melted, for greasing

    Equipment

    • Mixing bowls
    • Whisk
    • Rubber spatula
    • 9-inch baking pan
    • Oven

    Method
     

    1. Preheat the oven to 350°F (175°C) and grease a 9-inch round cake pan with melted butter, then dust with a little flour to prevent sticking.
    2. In a large mixing bowl, whisk the eggs and sugar together with a hand whisk until the mixture becomes pale, thick, and triples in volume, about 5-7 minutes, producing a ribbons stage when lifted.
    3. Gently fold in the vanilla extract and lemon zest using a rubber spatula, ensuring not to deflate the airy mixture.
    4. Sift the all-purpose flour and baking powder together, then gradually fold it into the wet mixture in batches, mixing softly until just combined and smooth.
    5. Pour the batter into the prepared cake pan and gently smooth the surface with a spatula. Tap the pan lightly on the counter to remove air bubbles.
    6. Bake in the preheated oven for 20-25 minutes, or until the top is golden and a toothpick inserted into the center comes out clean. The cake will be slightly domed and spring back when lightly pressed.

    Maybe it’s silly, but sometimes I think all food is just a way of holding onto moments that slip through our fingers—like that perfect, light sponge, slowly dissolving on your tongue. It’s not fancy, just honest. And honestly, that’s enough for today.

  • Banana Cake That Secretly Uses Old Bananas to Clean Your Kitchen Smell

    Banana Cake That Secretly Uses Old Bananas to Clean Your Kitchen Smell

    Unexpected Trick for Smelling Fresh

    Ever thought about using your overripe bananas for something other than throwing them away? I didn’t. Until I noticed how their sweet, fermented aroma kind of creeps into every corner of the kitchen. Turns out, mashing those squishy bananas and baking them into a cake can do more than just give you something sweet to eat — it kinda clears the bad smell, like a baking ritual for the house itself.

    This isn’t about just banana bread. It’s about the weird comfort in using what you have, and maybe resetting the vibe in your space. I’m not joking — the minute that batter hits the oven, suddenly the air gets a little lighter, a little sweeter. Old bananas are usually tossed aside, but messing around with them for this cake? Maybe they’re secretly best at fixing whatever funk you didn’t realize you had.

    Banana Ripe-Reset Cake

    This cake is a moist, dense treat made by mixing mashed overripe bananas with flour, sugar, and eggs, then baking until golden. The finished dessert has a tender crumb with a slightly domed top and a caramelized banana aroma, offering a hint of sweetness and natural fruit flavor.
    Prep Time 10 minutes
    Cook Time 30 minutes
    Total Time 40 minutes
    Servings: 8
    Course: Main Course
    Cuisine: home-baked
    Calories: 220

    Ingredients
      

    • 3 large overripe bananas mashed
    • 1 1/2 cups all-purpose flour
    • 1/2 cup granulated sugar
    • 2 large eggs
    • 1/3 cup vegetable oil
    • 1 teaspoon vanilla extract
    • 1/2 teaspoon salt salt

    Equipment

    • Mixing bowls
    • Whisk or electric mixer
    • Loaf pan or cake pan
    • Rubber spatula
    • Oven
    • Cooling rack

    Method
     

    1. Peel and mash the bananas in a mixing bowl until completely smooth, showing a soft, mashed consistency with no large lumps.
      3 large overripe bananas
    2. In a separate bowl, whisk together the eggs, vegetable oil, and vanilla extract until the mixture is well combined and slightly frothy.
      2 large eggs, 1/3 cup vegetable oil, 1 teaspoon vanilla extract
    3. Pour the egg mixture into the mashed bananas and stir with a rubber spatula until evenly incorporated.
      3 large overripe bananas, 2 large eggs, 1/3 cup vegetable oil, 1 teaspoon vanilla extract
    4. In a separate bowl, sift together the flour, sugar, baking soda, and salt. Gradually add the dry ingredients to the wet mixture, folding gently until just combined, with no streaks of flour remaining.
      1 1/2 cups all-purpose flour, 1/2 cup granulated sugar, 1/2 teaspoon salt salt
    5. Preheat the oven to 350°F (175°C) and grease your baking pan. Pour the batter into the pan, spreading evenly with a spatula.
      3 large overripe bananas, 1 1/2 cups all-purpose flour
    6. Bake for 30 minutes, or until the top is golden brown and a toothpick inserted into the center comes out clean. Wait for the cake to cool on a cooling rack before slicing.

    Come to think of it, I started this hoping my kitchen wouldn’t reek of forgotten fruit anymore. Honestly, I kinda feel like I stumbled upon a secret life hack. Who knew that banana cake wasn’t just dessert but a little home deodorizer in disguise? Maybe next time I’ll bake and breathe easier.

  • The Amish Cake Secret That Surprised Me

    The Amish Cake Secret That Surprised Me

    I’ve made a lot of cakes in my life. But this one? It’s got a thing that’s super rare — a hint of cinnamon in the batter that hits you as you cut into it. It’s not overpowering, just enough to stir memories of grandma’s kitchen, even if you’re not Amish and didn’t grow up pulling lightbulbs out to make your own vanilla extract.

    This cake’s kinda like that friend you haven’t seen in ages — comfortable, familiar, but with this little twist that makes you stop and think. It’s almost like the salt in this batter works in tandem with the sweetness, making each bite feel more real, more honest. It’s perfect for these chilly mornings, or that moment after dinner when you just want a quiet, no-fuss slice of something sweet and simple.

    Anyway, I kept wondering if I should add more cinnamon or less sugar… but really, it’s just right as is. Sometimes the quietest recipes carry the loudest stories.

    Cinnamon-Infused Vanilla Cake

    This cake combines a tender, moist crumb with a subtle hint of cinnamon woven into the batter, resulting in a lightly spiced flavor profile. The final appearance is a golden-brown, evenly risen cake with a soft texture that melts in your mouth, showcasing a delicate swirl of cinnamon aroma throughout.
    Prep Time 15 minutes
    Cook Time 35 minutes
    Total Time 50 minutes
    Servings: 8
    Course: Main Course
    Cuisine: American
    Calories: 320

    Ingredients
      

    • 2 cups all-purpose flour sifted
    • 1 1/2 cups granulated sugar
    • 1/2 cup unsalted butter melted and cooled slightly
    • 3 large eggs room temperature
    • 1 cup whole milk
    • 1 tablespoon vanilla extract
    • 1 teaspoon ground cinnamon preferably fresh ground
    • 1 teaspoon baking powder
    • 1/2 teaspoon salt

    Equipment

    • Mixing bowls
    • Electric mixer or whisk
    • Nine-inch cake pan
    • Parchment paper
    • Oven

    Method
     

    1. Preheat the oven to 350°F (175°C). Line a nine-inch cake pan with parchment paper and lightly grease it. Measure and sift the flour, baking powder, salt, and cinnamon into a large mixing bowl.
    2. In a separate bowl, whisk together the eggs and sugar until the mixture is pale and slightly thickened, about 2-3 minutes. Add the melted butter, vanilla extract, and milk, then stir until well combined.
    3. Gradually add the wet ingredients to the dry ingredients, folding gently with a spatula or mixing on low speed until just combined. The batter should be smooth with no streaks of flour. Do not overmix.
    4. Pour the batter into the prepared cake pan, smoothing the top with a spatula. Lightly tap the pan on the counter to release any air bubbles and ensure even distribution.
    5. Bake in the preheated oven for about 35 minutes, or until the top is golden brown and a toothpick inserted into the center comes out clean. The cake should be risen and slightly firm to the touch.
    6. Allow the cake to cool in the pan for 10 minutes, then transfer to a wire rack. Let it cool completely before slicing to reveal a moist crumb with a delicate cinnamon swirl visible across the interior.

    Sometimes I wonder if the Amish intentional simplicity is like a shortcut to the soul. This cake just feels honest. No fuss, no pretenses. A reminder that good things come in humble packages — like a cake from someone’s grandma’s recipe box, handed down and tweaked a little over time. I guess that’s what makes it special. Or maybe I just like the smell of cinnamon wafting through the kitchen.

  • The Surprising Science Behind Texas Sheet Cake’s Moistness

    The Surprising Science Behind Texas Sheet Cake’s Moistness

    Ever thought about why this cake stays so moist, even days later?

    It’s not just sugar and butter—there’s a little science trick that helps it stay tender and almost fudgy, even after sitting on your counter for a while. I found this out totally by accident. One time, I left a slice out overnight because I was too tired to put it away. Still soft. Still rich. The next day, I realized it was somehow better—like the flavors had mellowed and deepened. Turns out, there’s a simple ingredient that traps moisture in a way I never paid attention to before, and it’s kind of sneaky how effective it is.

    This cake feels especially relevant right now. Everything’s so fast, so trendy—this old classic? It’s got a quiet, unpretentious presence that fits the chaos of modern life. Plus, it’s cut into squares, easy to hold, bitterly nostalgic without trying too hard. No fuss, no fuss, just good, honest cake.

    Moist Fudge Cake

    This cake is baked using a simple batter that includes a moisture-trapping ingredient, resulting in a tender, fudgy crumb that stays moist for days. It involves mixing dry and wet ingredients, baking until just set, and cooling to achieve a dense, rich final texture with a slightly shiny crust.
    Prep Time 15 minutes
    Cook Time 35 minutes
    Total Time 50 minutes
    Servings: 8
    Course: Main Course
    Cuisine: American
    Calories: 350

    Ingredients
      

    • 1 1/2 cups all-purpose flour
    • 1 cup granulated sugar
    • 1/2 cup unsweetened cocoa powder unsweetened cocoa powder
    • 1 teaspoon baking powder baking powder
    • 1/2 teaspoon salt salt
    • 1/2 cup vegetable oil vegetable oil
    • 2 large eggs eggs
    • 1 teaspoon vanilla extract vanilla extract
    • 3/4 cup buttermilk buttermilk traps moisture for tenderness
    • Optional chocolate chips or chunks for added richness

    Equipment

    • Mixing bowls
    • Whisk
    • Baking Dish
    • Oven
    • Cooling rack

    Method
     

    1. Preheat the oven to 350°F (175°C). Lightly grease a baking dish and set aside.
    2. In a large mixing bowl, whisk together the flour, cocoa powder, sugar, baking powder, and salt until evenly combined. The mixture should look uniform and slightly powdery.
      1 1/2 cups all-purpose flour, 1 cup granulated sugar, 1/2 cup unsweetened cocoa powder unsweetened cocoa powder, 1 teaspoon baking powder baking powder, 1/2 teaspoon salt salt
    3. In a separate bowl, whisk together the eggs, vegetable oil, vanilla extract, and buttermilk until smooth and slightly frothy. The mixture should appear well combined with no streaks of eggs.
      2 large eggs eggs, 1/2 cup vegetable oil vegetable oil, 1 teaspoon vanilla extract vanilla extract, 3/4 cup buttermilk buttermilk
    4. Pour the wet mixture into the bowl of dry ingredients. Using a spatula or whisk, gently fold them together until just combined; do not overmix. The batter will be thick and smooth.
      1/2 cup vegetable oil vegetable oil, 2 large eggs eggs, 1 teaspoon vanilla extract vanilla extract, 3/4 cup buttermilk buttermilk
    5. If using chocolate chips, fold them into the batter now. Transfer the batter into the prepared baking dish, spreading evenly with a spatula.
      Optional chocolate chips or chunks
    6. Bake in the preheated oven for about 35 minutes, or until the top is set and feels slightly firm to the touch. A toothpick inserted into the center should come out with moist crumbs but no wet batter.
    7. Remove the cake from the oven and place on a cooling rack. Allow to cool for at least 20 minutes before slicing. The surface should have a slight sheen and the edges slightly pull away from the sides of the dish.

    Sometimes I think it’s these little unexpected details that keep us coming back. The way it’s dense without being heavy, the smell of cocoa and vanilla hitting you as soon as you open the pan. Maybe it’s the perfect thing to make on a whim, knowing it’ll still be good tomorrow—and probably better. Funny how a cake can be so simple but hold so many memories, right? Anyway, I’ll stop rambling. Just keep a close eye on that oven. Because once it’s out—yeah, it’s hard to resist slicing into it.

  • Cream Coffee Cake That Makes You Reconsider Breakfast

    Cream Coffee Cake That Makes You Reconsider Breakfast

    Why I Keep Coming Back to This Coffee Cake

    Honestly, I think it’s the smell that gets me first. Not just coffee—it’s the hint of vanilla, whispers of cinnamon, and the buttery crumble flirting with the air as it bakes. I didn’t plan to bake today, just looking for a quiet moment. Then the kitchen filled with that sweet, warm scent — like a little secret, just waiting to be discovered. I’ve tried plenty of coffee cakes, but this one sticks. It’s not overly sweet. The crumb has a slight crunch, but it’s tender inside, almost like an emotional comfort. Right now, it feels perfect—like something that could make a dull morning feel special without trying too hard. Recipes like this remind me that simple things sometimes matter most right now—more than fancy, more than complicated, just honest and straightforward.

    Coffee Cake with Cinnamon Crumble

    This coffee cake features a tender, moist crumb base topped with a crunchy cinnamon-sugar crumble. It is baked until golden on top, with a soft interior that reveals layered textures and a fragrant aroma of vanilla, cinnamon, and butter throughout.
    Prep Time 15 minutes
    Cook Time 35 minutes
    Total Time 50 minutes
    Servings: 8
    Course: Main Course
    Cuisine: American
    Calories: 350

    Ingredients
      

    • 2 cups all-purpose flour for the cake base and crumble topping
    • 1 cup granulated sugar divided for cake and crumble
    • 1/2 cup unsalted butter cold, for crumble and cake batter
    • 1 teaspoon ground cinnamon for crumble topping
    • 1 teaspoon vanilla extract for flavoring the batter
    • 1 cup milk whole or 2%
    • 2 large eggs for the batter
    • 1/2 cup vegetable oil adds moisture

    Equipment

    • Mixing bowls
    • Whisk
    • Loaf pan or baking dish
    • Measuring cups and spoons
    • Pastry Cutter or Fork

    Method
     

    1. Preheat the oven to 350°F (175°C). Grease your baking pan with butter or non-stick spray and set aside.
    2. Combine 1 3/4 cups of flour, 1/2 cup of sugar, and 1/2 teaspoon of cinnamon in a mixing bowl. Cut in the cold butter using a pastry cutter or fork until the mixture resembles coarse crumbs. Set aside for the crumble topping.
      2 large eggs, 1 teaspoon ground cinnamon
    3. In a separate large bowl, whisk together eggs, milk, vegetable oil, vanilla extract, remaining sugar (1/4 cup), and the remaining 1/4 cup of flour until smooth and well combined.
      1 teaspoon vanilla extract, 1 cup milk, 2 large eggs, 1/2 cup vegetable oil
    4. Pour the batter into the prepared baking dish, spreading it evenly with a spatula. Sprinkle the cinnamon crumble evenly over the batter.
      1 teaspoon vanilla extract
    5. Bake in the preheated oven for 35 minutes, or until the top is golden brown and a toothpick inserted into the center comes out clean. The cake should be puffed and set, with a slightly cracked top.
    6. Allow the coffee cake to cool in the pan for 10 minutes before transferring to a wire rack. Serve warm or at room temperature, revealing a moist interior topped with crunchy crumble.

    Maybe it’s just the smell. Or maybe I’ve always needed a cake that feels like a quiet, cozy secret. Whatever it is—I’ll be baking this again, probably tomorrow.

  • The Secret Nostalgia of McDonald’s Apple Pie—A Fresh Perspective

    The Secret Nostalgia of McDonald’s Apple Pie—A Fresh Perspective

    I never thought I’d break down a fast-food dessert like this, but here I am. The weird part? It’s the scent of fried apple chunks paired with that flaky crust. It smells like memories brewing in greasy paper bags—something I didn’t realize I missed so much. This pie isn’t about perfection; it’s about that moment when biting into a crisp, oozing apple filling you didn’t expect, made with a touch of sweetness and a pinch of salt. Right now, with fall creeping in, I keep craving those tiny bursts of apple and that sugary glaze. It’s not fancy. It’s not complicated. But somehow, it makes you stop and reconsider why some foods stick around, even if it’s just in the back of your mind.

    Fried Apple Pie

    This fried apple pie features a flaky crust filled with sweet, spiced apple chunks. The filling is cooked until tender and caramelized, then encased in the crust and fried to a golden brown, resulting in a crispy exterior and juicy interior with a sugary glaze.
    Prep Time 15 minutes
    Cook Time 10 minutes
    Total Time 25 minutes
    Servings: 6
    Course: Main Course
    Cuisine: American
    Calories: 350

    Ingredients
      

    • 2 cups all-purpose flour
    • 1/2 cup cold water for dough
    • 2 tablespoons unsalted butter cold, cubed
    • 1 pinch salt
    • 3 large medium apples peeled and chopped
    • 1/4 cup granulated sugar for filling
    • 1 teaspoon ground cinnamon for filling
    • 1/4 cup brown sugar for glazing
    • 1 cup vegetable oil for frying

    Equipment

    • Frying Pan
    • Rolling pin
    • Mixing bowls
    • Cooking spoon
    • Measuring cups and spoons
    • Wire Rack or Paper Towels

    Method
     

    1. Combine the flour, salt, and cold, cubed butter in a mixing bowl. Using a pastry cutter or your fingers, work until the mixture resembles coarse crumbs. Gradually add cold water, mixing until the dough just comes together. Wrap in plastic and refrigerate for 10 minutes.
      2 cups all-purpose flour, 2 tablespoons unsalted butter, 1 pinch salt
    2. While dough chills, peel and chop apples into small chunks. In a skillet, combine chopped apples with granulated sugar and ground cinnamon. Cook over medium heat, stirring frequently, until apples are tender and mixture thickens slightly, about 5-7 minutes. Remove from heat and set aside.
      3 large medium apples, 1/4 cup granulated sugar, 1 teaspoon ground cinnamon
    3. Remove dough from refrigerator and roll out on a lightly floured surface to about 1/8 inch thickness. Cut into circles using a cookie cutter or the rim of a glass, about 4-5 inches in diameter.
      2 cups all-purpose flour
    4. Place a spoonful of apple filling in the center of each dough circle. Fold the dough over to create a half-moon shape and seal the edges by pressing with a fork. Repeat for all filled circles.
      3 large medium apples
    5. Heat vegetable oil in a frying pan over medium heat until shimmering and about 350°F (175°C). Fry the pies in batches, turning occasionally, until golden brown and crispy, approximately 3-4 minutes per side. Use a slotted spoon to transfer to a wire rack or paper towels to drain excess oil.
      1 cup vegetable oil
    6. While still warm, brush the fried pies with brown sugar glaze or sprinkle with additional sugar. Serve hot or at room temperature.
      1/4 cup brown sugar

    Notes

    Ensure oil temperature is maintained for even frying. Adjust cooking time if pies are larger or smaller. For a sweeter glaze, melt additional brown sugar with a little water and brush on pies before serving.

    Maybe because it’s so simple. Or maybe because it’s the kind of thing you want to replicate, but never quite can. Still, I’ll keep trying. Just in case.