Category: Desserts

  • Shepherd’s Pie for the Curious Eaters: A Hidden Twist on a Classic

    Shepherd’s Pie for the Curious Eaters: A Hidden Twist on a Classic

    Ever wonder how the smell of roasted carrots melts into beefy gravy as it mingles with earthy thyme? It’s not just comfort; it’s a reminder that some recipes hold memories in their aroma. This isn’t your grandma’s Shepherd’s Pie, though. I swapped out the usual mashed potatoes for sweet potato and let the meat stew simmer with a splash of soy sauce. Yeah, that salty umami sneaks in.

    Right now, in the middle of winter, when all I want is something honest and filling but not overly fancy, this dish hits differently. You get that crispy crust on top, a little charred around the edges, and underneath, a messy mash of meat and vegetables. It’s like a warm secret buried under golden clouds. Would I call it elegant? Nope. But I’ll tell you, it’s just what some nights ask for.

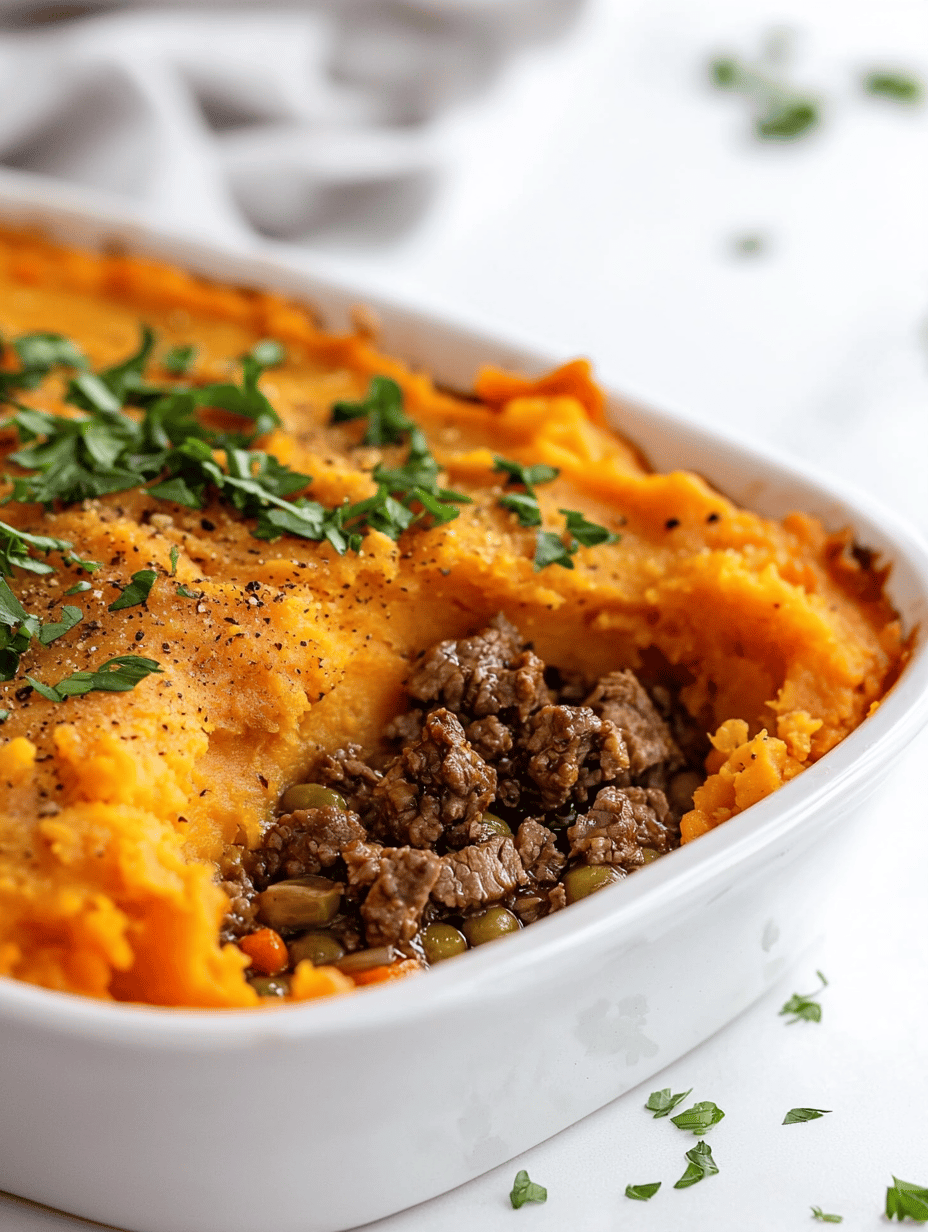
    Sweet Potato Shepherd’s Pie with Soy-Infused Beef

    This dish features a savory ground beef filling combined with roasted carrots and earthy thyme, topped with a layer of mashed sweet potatoes. The casserole is baked until the top is golden and slightly crispy, showcasing a hearty texture with tender vegetables and flavorful meat beneath a smooth, orange crust.
    Prep Time 20 minutes
    Cook Time 40 minutes
    Total Time 1 hour
    Servings: 4
    Course: Main Course
    Cuisine: Comfort Food
    Calories: 480

    Ingredients
      

    • 2 large carrots roasted and sliced
    • 1 lb ground beef preferably lean
    • 2 cloves garlic minced
    • 1 tablespoon soy sauce for umami flavor
    • 1 teaspoon thyme dried or fresh
    • 2 sweet potatoes sweet potatoes peeled and chopped
    • 2 tablespoons butter for mashing
    • 1/4 cup milk to loosen mash
    • salt to taste
    • pepper to taste

    Equipment

    • Chef’s knife
    • Cutting board
    • Skillet or frying pan
    • Medium pot
    • Mixing bowl
    • Whisk
    • Baking Dish

    Method
     

    1. Preheat the oven to 400°F (200°C). Place whole carrots on a baking sheet, toss with a little oil, and roast for about 20-25 minutes until tender and caramelized. Remove from oven, let cool slightly, then slice into rounds.
      1 lb ground beef
    2. Meanwhile, peel and chop sweet potatoes into even chunks. Place in a medium pot, cover with water, and bring to a boil over high heat. Cook for 15-20 minutes until very tender. Drain and transfer to a mixing bowl.
      1 lb ground beef
    3. Heat a skillet over medium-high heat. Add ground beef and cook until browned, about 8-10 minutes. Break apart the meat with a spoon as it cooks. Add minced garlic, thyme, soy sauce, salt, and pepper, and cook for another 2-3 minutes until fragrant. Remove from heat.
      1 lb ground beef
    4. Drain the cooked sweet potatoes and mash with butter and milk until smooth and creamy. Season with salt and pepper to taste. Set aside.
      1 lb ground beef
    5. Spread the beef mixture evenly in a baking dish, then layer the roasted carrots over the meat. Spoon the sweet potato mash on top, spreading it into an even layer with a spatula. Smooth the surface for an even crust.
      1 lb ground beef
    6. Bake in the preheated oven for 20-25 minutes, until the top is golden brown and slightly crispy around the edges. Let rest for 5 minutes before serving.

    Notes

    For added flavor, add a pinch of smoked paprika or chopped fresh herbs on top before baking.

    Sometimes you just need food that doesn’t pretend to be anything but honest. No fuss, no frills—just a plate that tastes like I meant it to. Shepherd’s Pie, but with a little more swagger.

  • Triple Berry Pie: The Unexpected Comfort of Overripe Fruit

    Triple Berry Pie: The Unexpected Comfort of Overripe Fruit

    Why I’m obsessed with squirreling away overripe berries

    Honestly, it’s the smell. That deep, jammy scent of overripe blackberries, strawberries turning honeyed, and blueberries with that sweet, earthy unpredictability. It hits you the moment you open the fridge or stumble into the kitchen. I used to toss these softened berries aside, thinking they weren’t good enough for anything. Now I realize they’re the secret ingredient that makes this pie special. It’s about giving a second chance to fruit that somehow goes beyond their peak. That little bit of fermenting juice inside them? Adds a complexity you don’t get from fresh berries. Especially now, in the heat of summer when berries are everywhere but also mangoing on just a little too long. Sometimes the best things come from ignoring the rules.

    Pie isn’t about perfection. It’s about catching the moment when berries start whispering that they’re past their best but still hold that sweet, tart promise underneath.

    Maybe it’s silly, but I like the idea that this pie is a kind of redemption. For the berries, for me, for those moments when I need something familiar but with a little twist. Storage tip: don’t be afraid of those extra ripe berries. They’re the real star here.

  • Patriotic Rice Krispies: A Snack That Tells a Story

    Patriotic Rice Krispies: A Snack That Tells a Story

    This isn’t your typical Fourth of July treat. I’ve always thought snacks are sometimes better when they’re a little rebellious—like using strawberry-flavored marshmallows instead of the usual. Today, I wanted to make something that’s more than just red, white, and blue. It’s about the smell of toasted marshmallows mingling with the faint hint of vanilla and the crunch of that crispy cereal. No fancy ingredients—just that simple, honest moment when you realize, hey, this is a snack I made that feels like a small act of defiance against the boring. It brings back childhood, but tastes surprisingly fresh, a little bold even. These rice crispy squares aren’t just festive—they’re a reason to get your hands sticky, to share stories, maybe even argue about which color is better. Because sometimes, a snack is just a snack — but not today.

    Strawberry Marshmallow Crispy Squares

    This snack features toasted marshmallows and crispy cereal mixed with strawberry-flavored marshmallows, creating a sticky, crunchy treat. The mixture is melted and combined on the stovetop until smooth, then pressed into a pan to set, resulting in a golden, crisp-edged bar with a chewy interior.
    Prep Time 10 minutes
    Cook Time 10 minutes
    Total Time 20 minutes
    Servings: 8
    Course: Main Course
    Cuisine: American
    Calories: 150

    Ingredients
      

    • 6 cups corn syrup or light corn syrup
    • 3 cups white sugar
    • 1/2 cup unsalted butter
    • 8 oz strawberry flavored marshmallows
    • 4 cups regular crispy rice cereal
    • 2 cups strawberry marshmallows

    Equipment

    • Large saucepan
    • Rubber spatula
    • 9×13 inch baking pan
    • Parchment paper
    • Measuring cups
    • Cooking spray

    Method
     

    1. Line the baking pan with parchment paper and lightly spray with cooking spray to prevent sticking.
    2. Combine the corn syrup, white sugar, and butter in a large saucepan over medium heat.
      6 cups corn syrup
    3. Stir continuously with a rubber spatula until the mixture begins to boil and the sugar fully dissolves, about 5 minutes. Watch for bubbling around the edges and a consistent boil.
    4. Add the strawberry marshmallows to the hot syrup mixture, stirring constantly until melted and smooth, which should take 3-4 minutes. The mixture will turn pink and glossy.
      6 cups corn syrup
    5. Remove the saucepan from heat. Immediately add the regular crispy rice cereal and strawberry marshmallows, folding gently to evenly coat the cereal and incorporate the additional marshmallows without crushing.
      6 cups corn syrup
    6. Pour the mixture into the prepared pan, spreading evenly with a spatula. Press down gently to compact the mixture into an even layer. Allow to cool at room temperature for at least 30 minutes before cutting into squares.

    Notes

    Ensure that the marshmallows are fully melted to avoid lumps. Use a buttered spatula for easier spreading. For a more intense strawberry flavor, incorporate a few drops of strawberry extract into the mixture.

    Honestly, I might have eaten half the batch before I even got around to writing this. Guess that’s the point.

  • Why Rice Krispie Treats Are the Unexpected Comfort Food You Need Right Now

    Why Rice Krispie Treats Are the Unexpected Comfort Food You Need Right Now

    This isn’t about the usual softness or sweetness. It’s about that crackle, the tiny pop when you bite into a perfectly pressed bar. I made a batch without looking at a recipe—just eyeballed the marshmallow and butter, and for a second I forgot how that sound used to be the highlight of my afternoons back in elementary school.

    No fancy ingredients. No fancy tricks. Just that fresh, almost toasted smell of butter melting into marshmallow, filling the kitchen with a kind of nostalgia I didn’t realize I craved—like a little reminder of simpler days. Right now, with everything feeling so loud and complicated, I keep reaching for these. No fuss, no fussiness, just crunchy edges and gooey middles. Maybe those old-school treats are less about what they’re made of and more about the quiet, sticky seconds they offer.

    Old-Fashioned Rice Krispies Treats

    This dish involves melting butter and marshmallows together on the stove to create a sticky, gooey mixture. The marshmallow mixture is then combined with crispy rice cereal, pressed into a pan, and allowed to set until firm and crispy on the edges yet chewy in the center, resulting in a textured bar with a glossy surface.
    Prep Time 10 minutes
    Cook Time 10 minutes
    Total Time 20 minutes
    Servings: 12
    Course: Main Course
    Cuisine: American
    Calories: 140

    Ingredients
      

    • 3 tablespoons unsalted butter plus extra for greasing
    • 10 cups mini marshmallows
    • 6 cups rice cereal e.g., Rice Krispies

    Equipment

    • Medium saucepan
    • Rubber spatula
    • 8×8 inch baking pan
    • Parchment paper

    Method
     

    1. Grease the bottom and sides of an 8×8 inch baking pan with butter, then line it with parchment paper for easy removal.
    2. In a large medium saucepan, melt the 3 tablespoons of butter over medium heat, stirring occasionally, until it is fully melted and begins to foam with a slightly toasted aroma, about 2 minutes.
      3 tablespoons unsalted butter
    3. Add the mini marshmallows to the melted butter in the saucepan. Stir continuously with a rubber spatula until the marshmallows are completely melted and the mixture is smooth, about 4-5 minutes. You should see the mixture become glossy and smooth, with a slight bubbling around the edges.
      3 tablespoons unsalted butter
    4. Remove the saucepan from heat, then immediately pour in the rice cereal. Using the rubber spatula, gently fold the cereal into the marshmallow mixture until evenly coated, ensuring no cereal is left dry or clumped.
      3 tablespoons unsalted butter
    5. Transfer the mixture into the prepared pan. Press it evenly into the pan using the back of the spatula or wax paper, creating a compact and level layer. Press gently to avoid crushing the cereal, but ensure it’s firmly packed.
    6. Allow the treats to cool at room temperature for at least 20-30 minutes until set and firm. Cut into squares and serve once completely cooled and solidified with crunchy edges and chewy centers.

    Sometimes I think the best recipes are the ones that connect us to a moment, a memory. Or maybe they just silence the noise for a little while. Whatever the reason, I’ll probably be pulling these out of the box again tomorrow, just to taste that loud, perfect snap.

  • The Secret Ingredient in My Perfect Sugar Cookies

    The Secret Ingredient in My Perfect Sugar Cookies

    I started baking sugar cookies because I needed a reason to buy a vintage cookie cutter I found at an estate sale. No fancy tricks, no dietary drama. Just wanted that slightly cracked edge, the golden aroma of butter and vanilla filling the kitchen. As I flour the counter, I think about how these cookies are kind of like old friends. Familiar but still surprising. Just enough crunch on the outside, soft inside — that pristine bite that doesn’t stick to your teeth. It’s weird how I can smell the baking of hundreds of holiday treats, but one whiff of this simple sugar dough feels different, almost like childhood in a pinch. Right now, they feel more real than ever. Maybe it’s the season, or maybe it’s just how strange comfort tastes. Basically, I keep wondering if this is the last batch I’ll make this year — or maybe the first of many.

    Classic Sugar Cookies

    Creamed butter and sugar are combined to form a smooth dough, which is then rolled out and cut into shapes. The cookies are baked until lightly golden, resulting in crisp edges and a soft, tender interior with a slightly cracked surface. Their simple appearance and nostalgic aroma make them a timeless holiday treat.
    Prep Time 20 minutes
    Cook Time 10 minutes
    Total Time 30 minutes
    Servings: 24
    Course: Main Course
    Cuisine: American
    Calories: 150

    Ingredients
      

    • 1 cup unsalted butter softened at room temperature
    • 1 cup granulated sugar
    • 1 large egg at room temperature
    • 2 teaspoons vanilla extract
    • 2 ¾ cups all-purpose flour
    • 1/2 teaspoon baking powder
    • 1/4 teaspoon salt

    Equipment

    • Mixing bowls
    • Rolling pin
    • Cookie cutters
    • Baking sheet
    • Parchment paper
    • Cooling rack

    Method
     

    1. Using a mixer or whisk, beat together the softened butter and granulated sugar in a large mixing bowl until the mixture appears light and fluffy, about 3 minutes, and has a pale yellow color.
      1 cup unsalted butter, 1 cup granulated sugar
    2. Add the egg and vanilla extract to the bowl, then continue mixing until fully incorporated and the mixture is smooth, about 1 minute.
      1 large egg, 2 teaspoons vanilla extract
    3. In a separate bowl, whisk together the flour, baking powder, and salt. Gradually add this dry mixture to the wet ingredients, mixing on low speed until a soft dough forms and begins to pull away from the sides of the bowl.
      2 ¾ cups all-purpose flour, 1/2 teaspoon baking powder, 1/4 teaspoon salt
    4. Divide the dough into two halves, then transfer each onto a lightly floured surface. Use a rolling pin to evenly roll each piece to about ¼ inch thickness.
    5. Use cookie cutters to cut out shapes from the rolled dough, then transfer the shapes to a parchment-lined baking sheet, spacing them about 1 inch apart.
    6. Bake the cookies in a preheated oven at 350°F (175°C) for 8-10 minutes, or until the edges are lightly golden and the surface shows slight cracking patterns. Remove from the oven and allow to cool on a wire rack for at least 10 minutes before serving.

    Some days, you make cookies because they’re a ritual. Or maybe just because you ran out of clean bowls and there’s still half a vanilla bean in the fridge. Either way, I guess it’s about those small, quiet moments. Baking a batch, hearing the crackle of the edges. And realizing that sometimes, simple really is enough.

  • Banoffee Cake: The Dessert I Didn’t Know I Needed

    Banoffee Cake: The Dessert I Didn’t Know I Needed

    So, I didn’t realize until I started layering this that banana and toffee aren’t just good together. They’re perfect—like a secret handshake. Greenish bananas, ripened to just the right point, get all sweet and jammy when baked with heaps of caramel. I kept smelling something like toasted sugar and melting butter, that weird warm glow in your nose. It’s not overly sweet, but there’s this punch of caramel-rich aroma that just hangs in the air. Makes the whole kitchen smell like a bakery I’d want to live in forever.

    And honestly? I wasn’t aiming for a showstopper. Just wanted something that feels like comfort and celebration in the same bite. This cake feels pointless without that sticky, crumbly top—because it’s not just a dessert, it’s a little reminder that sometimes, the best things come from sticking a banana in a little more trouble.

    Banana Toffee Cake

    This dessert features ripe bananas baked with caramel to create a jammy interior topped with a sticky, crumbly crust. The baking process results in a moist, tender texture with a rich, caramelized aroma and a golden-brown finish.
    Prep Time 15 minutes
    Cook Time 40 minutes
    Total Time 55 minutes
    Servings: 8
    Course: Main Course
    Cuisine: baked
    Calories: 350

    Ingredients
      

    • 3 large ripe bananas preferably greenish and just ripened to jammy stage
    • 1 cup brown sugar for caramel flavor
    • 1/2 cup unsalted butter melted and browned for caramelization
    • 1 cup all-purpose flour for crumbly topping
    • 1/2 teaspoon baking powder
    • 1/4 teaspoon salt

    Equipment

    • Mixing bowls
    • Whisk
    • Baking dish or springform pan
    • Oven
    • Spatula
    • Cooking thermometer (optional)

    Method
     

    1. Peel and roughly chop the bananas, then measure. Place into a mixing bowl and mash with a fork until mostly smooth with small lumps remaining.
    2. Combine the melted butter and brown sugar in a saucepan over medium heat. Stir continuously until the mixture just begins to bubble and turns a deep amber color, indicating caramelization.
      3 large ripe bananas
    3. Pour the hot caramel mixture into the mashed bananas, stirring quickly to blend and incorporate the caramel evenly. The mixture should be smooth and glossy.
      3 large ripe bananas
    4. Preheat the oven to 350°F (175°C). In a separate bowl, whisk together the flour, baking powder, and salt. Add this dry mixture to the banana-caramel mixture, gently folding until just combined.
      3 large ripe bananas
    5. Transfer the batter into a greased baking dish or springform pan. Spread evenly with a spatula. Bake in the preheated oven for 35-40 minutes, or until the top is golden brown and a toothpick inserted into the center comes out clean. You should hear a slight bubbling sound from the caramel as it bakes.
    6. Remove from the oven and let cool slightly. The top should be sticky and crumbly with caramelized edges. Serve warm or at room temperature, displaying a glossy, caramelized surface and tender, jammy interior.

    Some days, all I want is something that surprises me in the middle of a regular week. This cake for sure counts. No fancy words, just a bite worth remembering when you’re not expecting it.

  • Strawberry Crumble Cake: A Hidden Nostalgia in Every Slice

    Strawberry Crumble Cake: A Hidden Nostalgia in Every Slice

    When I first saw strawberries sitting on the market table, I remembered something odd — how their scent shifts as they sit a little longer. That sweet, jammy aroma turns almost ferment-like, surprising me every time. So I thought, what if I let them sit, get a little wild, then turn it into something that’s not just a dessert but a small rebellion against the usual?

    There’s a moment when the strawberries’ bright juice mingles with the brittle, toasted oats of the crumble — it’s loud and messy. It feels like unearthing a childhood memory that never quite matched the one your mom told you about. And honestly, right now, in late spring, when berries are everywhere but not quite perfect yet, this feels like a quiet way to say I’m paying attention to the little things.

    Why It Matters

    This isn’t about sugar-coating strawberries. It’s about embracing their quirks, their tiny imperfections. It’s also just a damn good reason to turn on the oven and smell something sweet and warm filling up the house. Nothing fancy, just a slice of something honest and a little messy.

    Wild Strawberry and Oat Crumble

    This dessert features ripe strawberries that have macerated to intensify their aroma and flavor, combined with a crunchy oat-based crumble topping. The dish is assembled and baked until the strawberries release their juices and the crumble turns golden brown, resulting in a warm, rustic presentation with a contrast of juicy fruit and crisp topping.
    Prep Time 15 minutes
    Cook Time 30 minutes
    Total Time 45 minutes
    Servings: 4
    Course: Main Course
    Cuisine: fusion
    Calories: 350

    Ingredients
      

    • 500 g fresh strawberries hulled and sliced
    • 2 tbsp granulated sugar to macerate strawberries
    • 1 cup rolled oats for crumble topping
    • 1/2 cup all-purpose flour helps bind the crumble
    • 1/3 cup brown sugar for sweetness in the topping
    • 1/4 cup unsalted butter cold and cubed
    • 1/4 teaspoon salt enhances flavors

    Equipment

    • Mixing bowls
    • Baking Dish
    • Oven
    • Measuring cups and spoons
    • Spatula
    • Slice knife

    Method
     

    1. Place the sliced strawberries in a mixing bowl, sprinkle with 2 tablespoons of granulated sugar, and toss gently. Cover and let sit at room temperature for 15 minutes until the strawberries release their juices and develop a jammy aroma, visible as a glossy release of liquid.
      500 g fresh strawberries, 2 tbsp granulated sugar
    2. Preheat the oven to 350°F (175°C). In a separate bowl, combine the rolled oats, flour, brown sugar, and salt. Add the cold, cubed butter and use a pastry cutter or fingers to work the butter into the mixture until it resembles coarse crumbs and begins to clump together. The mixture should look like a sandy, crumbly texture with some slightly larger oat pieces.
      1 cup rolled oats, 1/2 cup all-purpose flour, 1/3 cup brown sugar, 1/4 cup unsalted butter, 1/4 teaspoon salt
    3. Transfer the macerated strawberries along with their juices into a baking dish, spreading them evenly. Distribute the crumble mixture over the top in an even layer, covering all the fruit. Slightly press down some areas of the crumble for better adhesion.
      500 g fresh strawberries, 1 cup rolled oats, 1/2 cup all-purpose flour, 1/3 cup brown sugar, 1/4 cup unsalted butter, 1/4 teaspoon salt
    4. Place the baking dish in the preheated oven and bake for approximately 30 minutes. Look for bubbling juices around the edges and a golden-brown, crisp topping indicating doneness. The aroma of toasted oats and warm berries should fill the kitchen.
    5. Remove the dish from the oven and let it cool slightly for about 10 minutes. The crumble should be set with a crunchy topping and bubbling fruit beneath. Serve warm, optionally with a scoop of ice cream or a dollop of whipped cream.

    Maybe I’ll burn the edges a little next time. Or throw in a handful of chopped almonds for no real reason. Whatever it is, I’ll be eating this with the crumbs crunching under my teeth and thinking about those strawberries, wild and a little reckless, just like the season.

  • The Unexpected Science Behind My Lemon Raspberry Cake’s Bright Flavor

    The Unexpected Science Behind My Lemon Raspberry Cake’s Bright Flavor

    I used to think sensory experiences in cooking were purely about taste and smell. Turns out, it’s also about sound. Yes, sound. When I cut into this cake, there’s this soft crunch of the raspberries breaking, followed by the faintest pop as the lemon curd-like filling spills out. I’ve never paid attention to that moment before—how the dish sounds can be just as telling as how it tastes. Right now, with fresh berries and zesty lemons flooding the markets, this cake feels like a little science experiment I didn’t plan, but love to do. No frosting curtain, just the pure, slightly tart tang playing off the sweet, flaky crust. It’s the kind of thing that makes me forget my phone, forget the day. Just that simple, honest moment—something real that a slice can trigger. Makes me wonder if food can actually surprise us after all, even in the quiet moments.

    Berry Lemon Curd Cake

    This cake features a flaky, golden crust filled with a bright, lemon-curd-like filling and topped with fresh raspberries. It is assembled from a tender pastry base, a tangy lemon filling that spreads smoothly, and a topping of whole berries that add a burst of flavor and texture. The final dessert has a crisp crust, creamy filling, and juicy berry topping, with varying textures and a visually appealing presentation.
    Prep Time 30 minutes
    Cook Time 40 minutes
    Total Time 1 hour 10 minutes
    Servings: 8
    Course: Main Course
    Cuisine: Dessert
    Calories: 350

    Ingredients
      

    • 1 ¼ cups all-purpose flour for the crust
    • ½ cup unsalted butter cold, cubed
    • 2 tablespoons sugar for the crust
    • ¼ teaspoon salt
    • 2 large eggs for filling and crust
    • ½ cup fresh lemon juice for the lemon curd
    • 1 tablespoon zest of lemon for flavor
    • ¾ cup granulated sugar for lemon curd
    • 3 tablespoons unsalted butter melted, for lemon curd
    • 1 pint fresh raspberries for topping

    Equipment

    • Mixing bowls
    • Rolling pin
    • Springform pan
    • Whisk
    • Small saucepan
    • Spatula
    • Cooling rack

    Method
     

    1. In a mixing bowl, combine the flour, sugar, and salt. Add the cold, cubed butter and use a pastry cutter or fingers to blend until the mixture resembles coarse crumbs with pea-sized butter pieces.
      1 ¼ cups all-purpose flour, ½ cup unsalted butter, 2 tablespoons sugar, ¼ teaspoon salt
    2. Add one egg to the mixture and gently knead until a cohesive dough forms. Turn onto a lightly floured surface and press into a flat disk. Wrap in plastic wrap and chill in the refrigerator for at least 30 minutes.
      2 large eggs
    3. Preheat the oven to 350°F (175°C). Roll out the chilled dough on a lightly floured surface to about ¼-inch thickness. Carefully transfer it into a greased springform pan, pressing it into the bottom and sides, then trim excess dough. Poke the crust with a fork a few times.
    4. Bake the crust for 15-20 minutes until golden brown. Remove from oven and let cool slightly.
    5. In a small saucepan, whisk together the eggs, lemon juice, lemon zest, sugar, and melted butter. Cook over medium-low heat, stirring continuously, until the mixture thickens and coats the back of a spoon, about 10 minutes.
      2 large eggs, ½ cup fresh lemon juice, 1 tablespoon zest of lemon, ¾ cup granulated sugar, 3 tablespoons unsalted butter
    6. Pour the warm lemon curd into the cooled crust and spread evenly with a spatula. Chill the cake in the refrigerator for at least 2 hours to set.
    7. Just before serving, arrange the fresh raspberries on top of the set lemon filling for a vibrant finish.
      1 pint fresh raspberries

    Sometimes I forget that baking is just science in a slightly chaotic, beautiful form. How a bit of lemon juice and a handful of raspberries can alter the whole mood of the afternoon. Guess I’ll just keep testing. Maybe next time I’ll add a splash of sparkling wine — why not?

  • Peach Mango Pie: More Than Just Fruit, It’s Memory in Flakes

    Peach Mango Pie: More Than Just Fruit, It’s Memory in Flakes

    The Unexpected Charm of Ripe Overreach

    I don’t usually bake with fruit that’s practically screaming to be picked—like these peaches and mangoes. It’s the smell that gets you: tropical sweetness, a hint of earth under all that juicy heat. My grandmother’s kitchen was never much for fancy cooking, but her pies? They had an honest messy beauty, like a kid’s drawing. That’s what makes this Peach Mango Pie feel right now. It’s not just about cracking flaky crust around a fruit mash. It’s about holding onto the summer that won’t quit, even as the days slowly cool. These fruits are abundant, and yes, maybe I’m trying to lock in the sunlight a little before it’s gone. Because sometimes a pie isn’t just a dessert. It’s a little rebellion against the fleeting. A small, sweet reminder of what’s worth grabbing while it lasts.

    Peach Mango Pie

    This pie features a flaky, golden-brown crust filled with a mash of ripe peaches and mangoes. The fruit filling is cooked until thickened and bubbly, resulting in a juicy and tender interior with a slightly crisp crust that holds its shape when sliced.
    Prep Time 30 minutes
    Cook Time 45 minutes
    Total Time 1 hour 15 minutes
    Servings: 8
    Course: Main Course
    Cuisine: American
    Calories: 350

    Ingredients
      

    • 1 1/2 cups all-purpose flour for the crust
    • 1/2 cup unsalted butter cold and cubed
    • 4-5 tablespoons ice water
    • 3 large peaches peeled, pitted, and chopped
    • 2 mangoes ripe mangoes peeled and chopped
    • 1/2 cup granulated sugar adjust to taste
    • 2 tablespoons cornstarch as a thickener
    • 1/4 teaspoon ground cinnamon optional
    • 1 egg egg beaten, for egg wash
    • 1 tablespoon water for egg wash

    Equipment

    • Rolling pin
    • 9-inch Pie Dish
    • Mixing bowls
    • Saucepan
    • Fork
    • Pastry brush

    Method
     

    1. Combine flour and salt in a mixing bowl. Add cold, cubed butter and use a pastry cutter or fork to cut in the butter until the mixture resembles coarse crumbs with some pea-sized pieces.
      1 1/2 cups all-purpose flour, 1/2 cup unsalted butter
    2. Add ice water gradually, one tablespoon at a time, mixing gently with a fork until the dough just begins to come together. Gather the dough into a disc, wrap in plastic wrap, and refrigerate for at least 30 minutes.
      4-5 tablespoons ice water
    3. Preheat the oven to 425°F (220°C). Remove the chilled dough from the refrigerator, and on a lightly floured surface, roll it out into a 12-inch circle. Fit the crust into a 9-inch pie dish, trimming excess edges.
    4. In a mixing bowl, combine chopped peaches and mangoes. Add sugar, cornstarch, cinnamon, and mix well. Let sit for 10 minutes to allow juices to combine.
      3 large peaches, 2 mangoes ripe mangoes, 1/2 cup granulated sugar, 2 tablespoons cornstarch, 1/4 teaspoon ground cinnamon
    5. Pour the fruit mixture into the prepared pie crust, spreading it evenly. Dot with small bits of extra butter if desired.
    6. Roll out the second dough disc or prepare a lattice top if preferred. Place the top crust over the filling and trim the edges. Seal the edges by pinching or crimping. Brush the top with beaten egg mixed with water to give it a shiny, golden finish.
      1 egg egg, 1 tablespoon water
    7. Bake in the preheated oven for 45 minutes or until the crust is golden brown and the filling is bubbling through the vents. Check midway and cover edges if they brown too quickly.

    Maybe I’ll leave some of the juice on the counter, see if it peters out or if I end up finishing it straight from a spoon. Honestly, that’s kind of the point, isn’t it?

  • Coconut Cream Pie: The Unexpected Power of a Quiet Ingredient

    Coconut Cream Pie: The Unexpected Power of a Quiet Ingredient

    Why Coconut?

    I was flipping through an old cookbook, weirdly enough, looking for a recipe that had nothing to do with pie. And there it was—coconut. Not the shredded stuff in my pantry but real, toasted, fragrant coconut flakes. The kind that crackle when you bite into them. That smell hits your nose like a warm breeze but also kinda feels like a secret handshake from my childhood. No fancy ingredients, just a nod to what’s simple but overlooked. It hit me that coconut isn’t just tropical fluff. It’s in cafes, kitchens, maybe even your grandma’s baking bin, waiting to surprise you. Right now, when sugar fixes seem overused, I think coconut’s kind of sneaky, whispering, “Hey, I got your back.” It’s not loud. Just quietly, irresistibly, coconutty.

    Toasted Coconut Cookies

    These cookies are made by mixing butter, sugar, and eggs, then folding in toasted coconut flakes and flour. The dough is baked until golden, resulting in crispy edges and chewy centers with a fragrant coconut aroma. The final cookies exhibit a light, crunchy texture with bits of caramelized coconut throughout.
    Prep Time 15 minutes
    Cook Time 12 minutes
    Total Time 27 minutes
    Servings: 24
    Course: Main Course
    Cuisine: baking
    Calories: 150

    Ingredients
      

    • 1 cup granulated sugar
    • 1 cup unsalted butter softened
    • 2 large eggs
    • 2 cups all-purpose flour
    • 1 cup toasted coconut flakes preferably homemade or properly toasted
    • 1/2 teaspoon baking soda

    Equipment

    • Mixing bowls
    • Baking sheet
    • Parchment paper
    • Toaster oven or oven
    • Spatula
    • Cooling rack

    Method
     

    1. Preheat the oven to 350°F (177°C). Spread coconut flakes on a baking sheet and toast in the oven for 5-7 minutes, stirring once, until golden brown and fragrant. Remove and set aside to cool.
    2. In a large mixing bowl, cream together the softened butter and sugar until the mixture appears light and fluffy, about 2-3 minutes, with visible increase in volume and a pale color.
    3. Add eggs one at a time to the creamed mixture, mixing well after each addition, until the batter is smooth and homogeneous.
    4. In a separate bowl, whisk together the flour, baking soda, and a pinch of salt. Gradually add the dry ingredients to the wet mixture, folding gently until just combined, resulting in a thick dough.
    5. Fold in the toasted coconut flakes until evenly distributed throughout the dough. Use a spatula to ensure the coconut is well incorporated.
    6. Using a spoon or cookie scoop, portion dough onto a parchment-lined baking sheet, spacing cookies about 2 inches apart. Bake in the preheated oven for 10-12 minutes, or until the edges are golden brown and the centers are set. Let cookies cool on a wire rack before serving.

    Notes

    Ensure coconut flakes are toasted thoroughly for maximum flavor. Cookies can be stored in an airtight container for up to a week.

    Sometimes I wonder if the best food rises from stories, not just recipes. This pie might seem plain until you realize… it’s the nutty, creamy, crispy moments that stick around. And honestly, that’s kinda how I want to live too.