These chocolate peanut butter truffles started as a pantry experiment that somehow turned into a small obsession. The salty crunch of peanut butter paired with silky, bittersweet chocolate feels like comfort in every bite, but with a little unexpected edge. I love how they come together quickly, no fancy equipment needed, just honest ingredients and a bit of patience.
Making these is a reminder that simple flavors can surprise you. There’s something about that salty-sweet combo that taps into childhood memories, yet feels totally gourmet when you roll them into little perfect spheres. They’re the kind of treat you want to keep in the fridge for when the craving hits, or to give away because you just can’t stop snacking on them yourself.
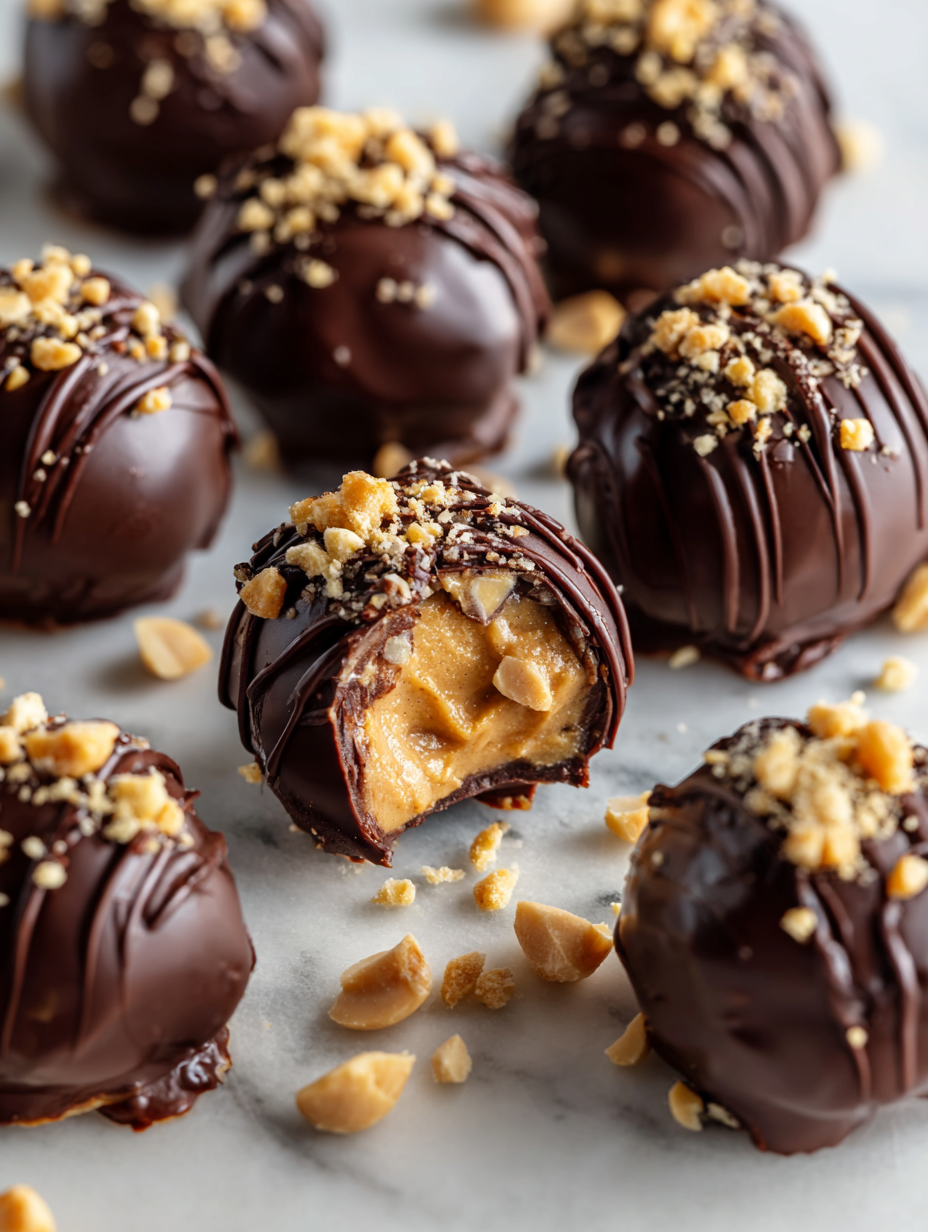
Focusing on the unexpected pairing of salty, crunchy peanut butter with rich, velvety chocolate, these truffles are a nostalgic twist on classic flavors that turn simple ingredients into a surprising, gourmet treat.
Unexpected Nostalgic Sweetness
- These truffles remind me of childhood afternoons, where salty peanut butter and smooth chocolate felt like secret treasures.
- I love how the salty crunch of peanut butter contrasts with the silky chocolate, making each bite unexpectedly complex.
- Baking these feels like a small rebellion—simple ingredients transforming into something indulgent and satisfying.
The inspiration behind these truffles
These truffles came about during a late-night fridge rummage, when I realized that the combo of salty peanut butter and dark chocolate could be a little more than just a snack. I wanted something that felt indulgent yet honest, no fuss, just good ingredients. The moment I rolled them into little balls and coated them in cocoa, I knew I had to share this simple, satisfying treat. It’s one of those recipes that feels like a secret between you and the pantry, waiting to surprise someone special or just satisfy that sweet craving.
Sweet & Salty Origins
- These truffles draw inspiration from European confections where salty and sweet flavors have long been paired, especially in Belgian pralines and French confections.
- The combination of peanut butter and chocolate became popular in the US during the 20th century, with brands like Reese’s pioneering the salty-sweet snack trend.
- Historically, truffles originated from small, luxurious chocolate confections shaped into balls, inspired by the underground fungi of the same name, but here it’s a playful twist with peanut butter.
Ingredient breakdown
- Good-quality dark chocolate: I prefer a rich, slightly bitter chocolate that melts smoothly and coats the palate. If you use sweeter chocolate, the balance shifts, so consider adjusting the sugar in the peanut butter.
- Creamy peanut butter: I stick to a natural, unsweetened variety that’s velvety and salty. For a different vibe, try a crunchy peanut butter for a bit of texture in your bites—just watch for excess oil.
- Unsalted butter: It adds richness and helps the mixture firm up. If you only have salted butter, reduce the added salt in the recipe to keep the flavor balanced.
- Powdered sugar: This sweetens and smooths the peanut butter mixture. If you want less sweetness, cut back a little—just note the texture might be slightly less silky.
- Cocoa powder: I use a good Dutch-processed cocoa for depth and a matte finish. For a touch of extra flavor, sprinkle a pinch of sea salt on the finished truffles to enhance the chocolate and peanut butter contrast.
- Optional: Sea salt flakes: A pinch on top brings out the salty-sweet harmony and adds a little crunch—think of it as a flavor exclamation point.
Spotlight on key ingredients
Dark chocolate & peanut butter:
- Good-quality dark chocolate: I prefer a rich, slightly bitter chocolate that melts smoothly and coats the palate. If you use sweeter chocolate, the balance shifts, so consider adjusting the sugar in the peanut butter.
- Creamy peanut butter: I stick to a natural, unsweetened variety that’s velvety and salty. For a different vibe, try a crunchy peanut butter for a bit of texture in your bites—just watch for excess oil.
- Unsalted butter: It adds richness and helps the mixture firm up. If you only have salted butter, reduce the added salt in the recipe to keep the flavor balanced.
Notes for ingredient swaps
- Dairy-Free: Swap regular butter for coconut oil or vegan butter. Expect a slightly different richness and a hint of coconut aroma.
- Peanut Butter: Use almond or cashew butter for a milder, nuttier flavor. Natural, unsweetened varieties work best for balance.
- Chocolate: Opt for milk chocolate if you prefer a sweeter, creamier coating. Dark chocolate gives a richer, more intense flavor.
- Powdered Sugar: Substitute with maple sugar or coconut sugar for a more natural sweetness, but note they may slightly alter the texture.
- Cocoa Powder: Use Dutch-processed for a smoother, less acidic flavor. For a more intense chocolate punch, try adding a pinch of espresso powder.
- Add-ins: Crushed pretzels or toasted coconut can add crunch and texture—just fold in before shaping the truffles.
Equipment & Tools
- Medium mixing bowl: For blending the ingredients
- Spatula: To mix and scrape ingredients
- Parchment-lined baking sheet: To set and chill the truffles
- Microwave-safe bowl: For melting chocolate
- Small cookie scoop or spoon: For portioning the truffle mixture
- Fork or toothpick: For dipping and coating in chocolate
Step-by-step guide to truffles
- Equipment & Tools: Use a medium mixing bowl for blending, a spatula for mixing, a small baking sheet lined with parchment for setting, and a microwave-safe bowl for melting chocolate.
- Start by chopping the dark chocolate into small, even pieces. Microwave in 30-second bursts, stirring in between, until smooth and fully melted. Be careful not to overheat—chocolate burns easily at high heat.
- In a separate bowl, combine 1 cup of creamy peanut butter with 1/4 cup of unsalted butter softened, and 1/2 cup of powdered sugar. Mix until smooth and slightly fluffy. The mixture should be thick but scoopable.
- Add the melted chocolate to the peanut butter mixture. Stir thoroughly until fully incorporated and shiny. If the mixture feels too stiff, gently warm it for a few seconds to loosen.
- Using a small spoon or cookie scoop, portion out 1-inch balls onto the prepared baking sheet. Chill in the fridge for 30 minutes, or until firm enough to handle.
- While the balls chill, melt an additional 1/2 cup of dark chocolate in the microwave in 20-second bursts, stirring each time until smooth. Let cool slightly but stay fluid.
- Remove the peanut butter-chocolate balls from the fridge. Using a fork or toothpick, dip each ball into the melted chocolate, ensuring a smooth coating. Tap gently to remove excess chocolate.
- Place the coated truffles back on the parchment-lined sheet. Optional: sprinkle a tiny pinch of sea salt on top for contrast. Chill for another 15-20 minutes to set the coating.
- Once set, store the truffles in an airtight container in the fridge for up to a week. For best texture, serve slightly chilled but not frozen. The chocolate should be crackly and the filling creamy.
Chill the coated truffles until firm, about 15-20 minutes. Serve slightly chilled or at room temperature. Arrange on a plate or store in an airtight container in the fridge. For a glossy finish, briefly warm the chocolate coating before serving.
How to Know It’s Done
- Chocolate coating: Should be smooth, shiny, and crackle when bitten.
- Filling consistency: Firm but scoopable, not greasy or crumbly.
- Appearance: Uniform spheres with a clean chocolate shell and a slight sheen.
Chocolate Peanut Butter Truffles
Ingredients
Equipment
Method
- Place the chopped dark chocolate in a microwave-safe bowl and melt in 30-second bursts, stirring between each until smooth and shiny. This will fill your kitchen with a rich chocolate aroma and a glossy finish.
- In a medium bowl, combine the creamy peanut butter and softened butter. Mix with a spatula until the mixture is smooth, creamy, and slightly fluffy, with a peanutty aroma filling the air.
- Add the sifted powdered sugar to the peanut butter mixture and stir until fully incorporated. The mixture should be thick but scoopable, with a slightly matte appearance.
- Pour the melted chocolate into the peanut butter mixture and stir thoroughly until well combined and shiny. The mixture will turn a rich, uniform brown, and smell decadently chocolatey.
- Using a small cookie scoop or spoon, portion out about 1-inch balls and place them on the parchment-lined baking sheet. Chill in the refrigerator for 30 minutes until firm and scoopable.
- Meanwhile, melt an additional 1/2 cup of dark chocolate in the microwave in 20-second bursts, stirring each time until smooth. Let it cool slightly to prevent seizing when dipping.
- Remove the peanut butter balls from the fridge. Using a fork or toothpick, dip each ball into the melted chocolate, turning gently to coat completely. Gently tap the fork on the side of the bowl to remove excess chocolate, then place the coated truffle back on the parchment.
- Optional: sprinkle a tiny pinch of sea salt flakes on top of each coated truffle to enhance the salty-sweet contrast. Chill for another 15-20 minutes until the chocolate coating is firm and crackly.
- Once set, transfer the truffles to an airtight container and store in the fridge for up to a week. Serve slightly chilled or at room temperature for the best texture—crackly chocolate and creamy filling guaranteed to delight.
Pro tips for perfect truffles
- & shiny: Melt chocolate slowly in short bursts to keep that glossy finish intact.
- Cold is key: Chill the peanut butter mixture until firm, making shaping easier and cleaner.
- Texture check: The filling should be firm but scoopable—if too sticky, chill a bit longer.
- Avoid over-melting: Remove chocolate from heat just before it’s fully melted to prevent seizing.
- Coat carefully: Use a fork or toothpick for smooth dipping, and tap gently to remove excess.
- Salt enhances: Sprinkle a tiny pinch of sea salt on the coated truffles for a flavor pop.
- Quick chill: Rest the dipped truffles in the fridge for 15-20 minutes until the coating is crackly and set.
Common mistakes and how to fix them
- FORGOT to temper the chocolate → Melt slowly and avoid burning.
- DUMPED in all ingredients at once → Mix gradually for smooth texture.
- OVER-TORCHED the chocolate → Remove from heat immediately and stir.
- MISSED chilling time → Ensure proper firming before coating.
Quick Fixes and Pantry Swaps
- When chocolate seizes, splash in a drop of vegetable oil and stir gently.
- If mixture is too sticky, chill for 10 minutes to firm up before shaping.
- DUMPED in all ingredients at once? Mix gradually to avoid lumps and uneven texture.
- Over-torched chocolate? Remove from heat immediately and stir in a small amount of hot cream.
- When in doubt, patch cracks with extra melted chocolate for a smooth finish.
Prep, store, and reheat tips
- Chill the assembled but uncoated truffles in the fridge for up to 2 hours to firm up the shape before dipping, which helps prevent melting and mess.
- Store the finished truffles in an airtight container in the fridge for up to a week; the cool temp keeps the chocolate crisp and the filling creamy.
- For longer storage, freeze the truffles up to 1 month; wrap them individually in parchment or plastic wrap for easy portioning.
- Reheat slightly in the fridge or at room temperature—chocolate coating stays crackly, and the peanut butter center remains smooth, with a rich aroma.
Top questions about chocolate peanut butter truffles
1. Can I use milk or white chocolate instead?
Use high-quality dark chocolate for a smooth, glossy coating that melts beautifully and balances the sweetness. Cheaper chocolates can seize or leave a dull finish.
2. Can I substitute the dark chocolate coating with something else?
Yes, but expect a sweeter, creamier flavor. Dark chocolate provides a richer contrast to the salty peanut butter, so adjust your sweetness accordingly.
3. What are some alternative coatings?
Absolutely. You can dip these in tempered chocolate, or for a different twist, roll them in crushed nuts or sprinkles instead of coating in chocolate.
4. How do I know if the mixture is ready to shape?
Chill the mixture until firm—about 30 minutes in the fridge. If it’s too soft, the balls won’t hold shape or will be messy to dip.
5. Can I freeze these truffles?
Yes, you can freeze the uncoated or coated truffles for up to a month. Wrap them well to prevent freezer burn and maintain freshness.
6. Can I use crunchy peanut butter?
Use natural peanut butter with minimal oil for the best texture. Crunchy peanut butter adds texture, but may require a slight adjustment in chilling time.
7. Should I add salt on top?
Yes, you can add a pinch of sea salt on top after coating for extra flavor. It enhances the salty-sweet contrast and adds a little crunch.
8. How do I melt chocolate without burning it?
Overheating chocolate can cause seizing or burning, resulting in a grainy texture. Melt slowly in short bursts and stir often.
9. How do I get a smooth chocolate coating?
Use a small spoon or fork to dip the balls, allowing excess chocolate to drip off. Tap gently on the side of the bowl for a clean, smooth coating.
10. How should I store the truffles?
For best flavor, serve these slightly chilled or at room temperature. Keep them refrigerated if not eaten within a few days to maintain freshness.
These truffles are a small reminder that simple ingredients can create something unexpectedly special. The salty crunch of peanut butter paired with rich chocolate feels like a nostalgic secret in every bite.
Whenever I make these, I think about how a tiny bit of chaos—like over-melting or rushing—can be fixed easily, reminding me that imperfect moments often lead to the best treats.

Hi, I’m Theo Granger, the voice and recipe creator behind Boldly Overseasoning.
If you believe salt is not the enemy, spices should be generous, and flavor should never whisper when it can sing, then you are absolutely in the right place. Boldly Overseasoning is my unapologetic celebration of big flavor, confident cooking, and trusting your instincts in the kitchen. I created this space for people who are done with bland food and ready to cook with courage.


Leave a Reply