There’s something about the surprise of a molten chocolate center that always feels a little rebellious, like breaking the rules just a bit. I love how each fondant is a tiny gamble—will it spill out rich, velvety chocolate or stay stubbornly firm? It’s a dessert that embraces chaos, yet somehow feels elegant in its imperfect, gooey glory.
Making a chocolate fondant is a bit like life—messy, unpredictable, but deeply satisfying when you get it right. I’ve had my share of overbaked versions that turn out cakey and sad, and underbaked ones that donish out too quickly. But when it hits just right, that warm center oozing out, it’s pure magic—an unpolished reminder that sometimes, the best moments are the messy ones.
Focusing on how the molten center of a chocolate fondant echoes the unpredictability of life—sometimes smooth, sometimes messy, always sweet. I love how each one feels like a tiny, personal surprise, almost like a little life lesson in dessert form.
Embracing Imperfection in Chocolate
- There’s a quiet joy in cracking open a warm fondant and watching the molten center flow out like a secret.
- This dessert reminds me of family gatherings—messy, loud, but always full of love and shared bites.
- Getting the timing right feels like a small victory—when it’s just barely set on the outside but oozy inside.
- I love how a simple chocolate cake can turn into a moment of pure indulgence, almost like a guilty pleasure in disguise.
- Baking these feels like a tiny rebellion—breaking the rules of traditional baking just enough to make something special.
The story behind this recipe
- This recipe started as a way to reclaim the messy, imperfect moments in baking. I remember the first time I tried making fondant—completely overbaked, but that rich, fudgy aroma made me realize it’s about embracing the flaws. Now, I love the anticipation of the molten center, the way it’s like a tiny, edible gamble every time. It’s not just a dessert, but a reminder that beauty often lives in the imperfect, gooey middle.
- heading: ‘The story behind this recipe’
Chocolate Fondant Trivia
- Chocolate fondant, also known as lava cake in some regions, gained popularity in France during the 1980s as a decadent, molten-center dessert.
- The concept of a molten center dates back to earlier French pastries, but modern fondants became iconic after a Parisian pastry chef accidentally overbaked a chocolate cake, revealing the gooey core.
- The name ‘fondant’ refers to the smooth, melting texture of the chocolate, which contrasts with the slightly firmer outer shell—an elegant play on textures.
- While often associated with haute cuisine, chocolate fondant has become a comfort-food staple worldwide, with countless variations and personal twists.
Ingredient breakdown: key components
- Dark chocolate: I use a high-quality 70% cocoa bar—it’s got that deep, slightly bitter edge that balances the sweetness. Swap with semisweet if you prefer a milder taste.
- Butter: I melt unsalted butter until it’s shimmering but not browned—gives the fondant that rich, velvety texture. You can try salted butter for a subtle salty contrast, just cut back slightly on added salt.
- Eggs: I whisk whole eggs with a touch of sugar until slightly frothy—this helps the batter rise and creates that tender crumb. For a lighter version, substitute with egg whites, but expect a firmer center.
- Sugar: I prefer superfine sugar for quick dissolution, giving a smooth, glossy finish. You could exchange it for coconut sugar for a hint of caramel flavor, though it will alter the texture.
- Flour: I sift in just a little all-purpose flour—enough to give structure without dulling the gooey core. Almond flour can be a good gluten-free alternative, adding a nutty note, but watch for moisture changes.
- Cocoa powder: I sift in unsweetened cocoa—deepens the chocolate flavor and darkens the batter. Dutch-processed cocoa lends a smoother, less acidic taste; natural cocoa keeps it lively and bright.
- Butter or oil for greasing: I use a soft brush to coat the ramekins lightly—this ensures easy release. You can also try non-stick spray, but I prefer butter for flavor and that subtle crust.
Spotlight on key ingredients
Dark chocolate:
- I prefer a 70% cocoa bar—deep, slightly bitter, with a velvety melt. Swap with semisweet for a milder flavor.
- Butter: I melt unsalted butter until shimmering; it creates that luscious, smooth texture. Salted butter adds a subtle contrast, but reduce salt slightly.
- Eggs: I whisk whole eggs with sugar until just frothy—this helps the batter rise and creates that tender crumb. Egg whites can be a lighter alternative, but expect a firmer center.
Cocoa powder:
- Butter: I use softened butter to coat the ramekins—ensures easy release and adds a rich flavor. Non-stick spray works, but butter gives a better crust.
- I sift unsweetened cocoa into the batter—deepens the chocolate flavor and darkens the color. Dutch-processed offers a smoother, less acidic taste, while natural cocoa keeps it lively.
Notes for ingredient swaps
- Dairy-Free: Swap butter for coconut oil or a neutral oil. Expect a slightly different mouthfeel, less richness but still satisfying.
- Vegan: Use dairy-free margarine or coconut oil, and replace eggs with flaxseed or chia seed gel. The texture may be a bit denser but still decadent.
- Lower Sugar: Reduce sugar by half or substitute with maple syrup or honey for a touch of floral sweetness. Watch for slight texture changes.
- Gluten-Free: Switch all-purpose flour with almond flour or gluten-free baking mix. Keep in mind it might alter the crumb slightly.
- Bittersweet Chocolate: Use a 70% cocoa bar instead of milk chocolate for a more intense, less sweet fondant—your palette will thank you.
- Cocoa Powder: Dutch-processed cocoa gives a smoother, less acidic flavor; natural cocoa will make it more lively and bright. Adjust sugar if needed.
- Butter or Oil for greasing: Use non-stick spray or brush with softened butter. Both work fine, but butter adds a richer flavor and helps with release.
Equipment & Tools
- Oven: To bake the fondant evenly at a precise temperature.
- Ramekins: To shape and contain the batter during baking.
- Heatproof bowl: For melting chocolate gently without burning.
- Spatula: To fold ingredients gently and smooth batter.
- Baking sheet: To hold ramekins steady and ensure even heat distribution.
- Cooling rack: To slightly cool before inverting and serving.
Guide to Perfect Chocolate Fondant
- Preheat your oven to 200°C (390°F). Have your ramekins ready, buttered and dusted with cocoa or flour. The key is to have everything set before you start mixing.
- Melt 200g dark chocolate with 100g butter in a heatproof bowl over a simmering pot, or gently in short bursts in the microwave. Stir until smooth. Smell that rich, cocoa aroma; it’s the soul of your fondant.
- In a separate bowl, whisk 3 eggs and 100g superfine sugar until just slightly frothy—about 1–2 minutes. The mixture should be slightly pale and glossy. This adds lightness and helps the batter rise.
- Fold the melted chocolate mixture into the eggs and sugar gently, just until combined. No need to overmix; keep the air in. You want a shiny, thick batter.
- Sift 50g all-purpose flour and 15g unsweetened cocoa powder into the batter. Carefully fold it in, just until no streaks remain. This gives structure without dulling the oozy center.
- Divide the batter evenly into your prepared ramekins—about 2/3 full. Smooth the tops with a spatula. Place on a baking sheet for stability.
- Bake for exactly 10–12 minutes. The edges should be set but the center still jiggly when gently shaken. The aroma will turn more intense and chocolatey.
- Remove from oven. Let sit for 1–2 minutes—this helps the molten center settle just enough. Then, gently invert each ramekin onto a warm plate. Tap lightly if needed to release.
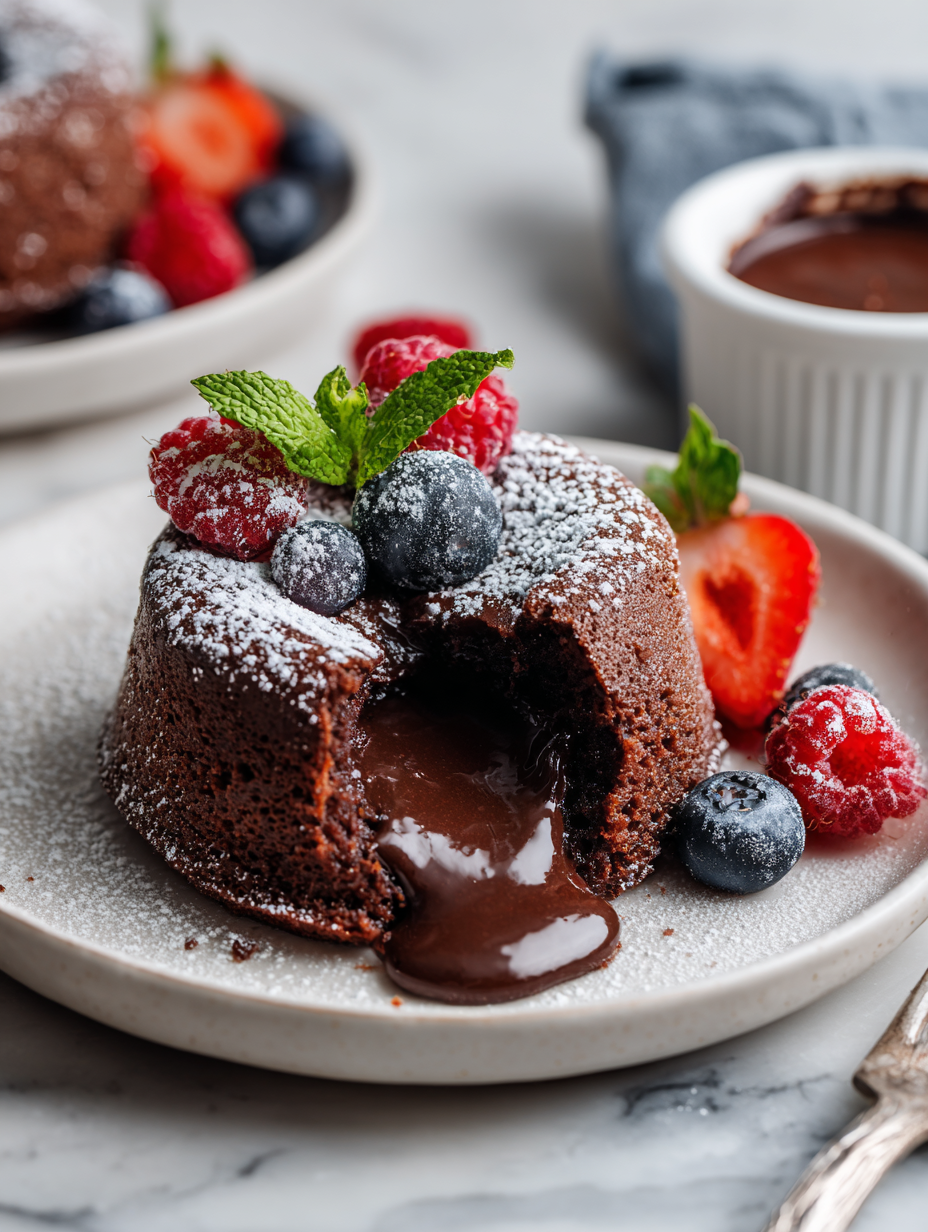
- Serve immediately, with a dusting of powdered sugar or a scoop of vanilla ice cream if desired. The outside should be firm, the inside flowing and velvety.
- Enjoy the crack of the crust and the rich, molten chocolate spilling out. The contrast of textures is what makes this so satisfying.
Let the fondants rest for 2 minutes after baking to firm up slightly. Invert onto plates carefully, then serve immediately for the best molten flow. Add a dusting of cocoa or a dollop of cream if you like.
How to Know It’s Done
- The outer shell is firm but not cracked; a gentle shake reveals a jiggly, gooey center.
- The surface has a slight crackle when touched and a deep chocolate aroma.
- When inserted with a probe, the center reads around 65°C (149°F), indicating molten consistency.
Chocolate Molten Fondant
Ingredients
Equipment
Method
- Preheat your oven to 200°C (390°F). Prepare four ramekins by thoroughly buttering them and dusting with cocoa powder to prevent sticking.
- Gently melt the dark chocolate and butter together in a heatproof bowl over simmering water or in short bursts in the microwave, stirring until smooth and glossy. Smell the rich aroma of melted chocolate as it combines.
- In a separate bowl, whisk the eggs and superfine sugar until the mixture becomes slightly frothy and pale, about 1-2 minutes. This adds lightness and helps the batter rise.
- Gently fold the melted chocolate mixture into the eggs and sugar, combining carefully to keep the batter airy and shiny.
- Sift in the all-purpose flour and cocoa powder, then fold gently until just combined, avoiding overmixing to keep the batter tender.
- Divide the batter evenly among the prepared ramekins, filling each about two-thirds full. Smooth the tops with a spatula for an even surface.
- Place the ramekins on a baking sheet and bake for 10 to 12 minutes. The outer shell should be firm, but the centers will still jiggle slightly when gently shaken.
- Remove from the oven and let sit for 1-2 minutes—this helps the molten center settle just right. Carefully invert each ramekin onto a warm plate, tapping gently if needed.
- Serve immediately while warm, with a dusting of cocoa powder or a scoop of vanilla ice cream for extra indulgence. The exterior should be tender and crack slightly, revealing the flowing, velvety chocolate center.
Notes
Tips for Perfect Chocolate Fondant
- Bolded mini-head: Use high-quality chocolate for a richer, more velvety molten center. The flavor depth really makes a difference.
- Bolded mini-head: Gently fold in dry ingredients to keep the batter airy—this helps achieve that perfect oozy texture.
- Bolded mini-head: Slightly underbake—10 to 12 minutes is ideal. The outer shell should be set but the center still jiggly.
- Bolded mini-head: Rest the fondants for 2 minutes after baking to allow the molten core to settle just right before flipping.
- Bolded mini-head: When inverting, tap lightly to release without cracking the delicate crust. Serve immediately for best flow.
- Bolded mini-head: For a cleaner presentation, dip your ramekin in warm water briefly before inversion to loosen the edges.
- Bolded mini-head: Use a timer and check at the 10-minute mark—every oven varies, and overbaking kills the ooze.
Common mistakes and how to fix them
- FORGOT to preheat the oven → Always preheat to ensure even baking.
- DUMPED batter into hot oven → Pour gently to avoid cracking the shell.
- OVER-TORCHED the fondant → Remove early; it continues cooking after oven stops.
- MISSED the timing cue → Use a timer; overbaking kills the molten center.
Quick fixes and pantry swaps
- When the fondant cracks upon release, splash warm water around the ramekin edges to loosen.
- If center isn’t molten after baking, increase oven time by 1 minute and check again.
- Dumped batter into a hot oven? Lower the temperature slightly and extend baking by 2 minutes.
- Overbaked fondant? Patch with a drizzle of warm ganache or melted chocolate for extra ooze.
- When the chocolate shimmers and crackles during baking, it’s a sign it’s just right.
Prep, store, and reheat tips
- You can prepare the batter up to a day ahead; keep it covered in the fridge. The richness develops overnight, and the batter remains oozy and fragrant.
- Baked fondants are best enjoyed fresh, but they can be stored in an airtight container in the fridge for up to 24 hours. Reheat gently in a warm oven or microwave, watching for the center to stay molten—aim for a slight crackle on the outer shell.
- Freezing baked fondants is possible for up to a month. Wrap each in plastic, then foil. Thaw at room temperature for 20 minutes, then reheat for 10–15 seconds in the microwave until just warmed but still gooey.
- Reheating alters the texture slightly—expect the center to be less oozy but still rich. To test if it’s ready, the outer shell should feel warm and slightly firm, with a gentle shake revealing a soft, molten core.
Top questions about chocolate fondant
1. How do I get the perfect molten center?
A molten center is achieved by baking the fondant just enough so that the edges are firm but the inside remains liquid, usually around 10-12 minutes at high heat.
2. What if my fondant isn’t oozy enough?
If the fondant is overbaked, the center will firm up. To fix this, try reheating gently or underbaking slightly next time.
3. What kind of chocolate should I use?
Use high-quality dark chocolate with at least 70% cocoa content for a rich, velvety melt. Cheaper chocolates may be too sweet or grainy.
4. How can I adjust the baking time?
For a softer shell, bake for 1 minute less than the recommended time. For a firmer shell, add an extra minute.
5. How do I unmold the fondant without breaking it?
Ensure ramekins are buttered and dusted with cocoa or flour to prevent sticking. Gently tap or invert to release without cracking.
6. How long can I keep baked fondant?
Baked fondants are best enjoyed immediately. To store, keep them in the fridge for up to 24 hours, then reheat gently.
7. Can I make this ahead and freeze it?
Yes, you can freeze unbaked batter for up to a month. Thaw at room temperature and re-bake for best results.
8. How do I reheat leftovers?
Reheat in a warm oven for 5 minutes or briefly in the microwave until the center is just warm and molten.
9. My fondant cracks during baking, what went wrong?
If the top cracks open, it’s likely overbaked. Next time, check at 10 minutes and remove when just set around the edges.
10. How can I tell when it’s done?
Use a Timer! Every oven varies. Keep a close eye after 10 minutes, and remove when the edges are firm but the center jiggles slightly.
There’s something uniquely satisfying about watching that molten chocolate center spill out when you cut into a fondant. It’s a messy, imperfect kind of perfection that makes each attempt a small, delicious gamble. These little desserts remind me that sometimes, the best moments come from embracing a bit of chaos in the kitchen.
In the end, it’s about that rich, velvety flow of chocolate paired with a slightly crisp exterior—an experience that’s both nostalgic and indulgent. No matter how many times I bake them, that moment of anticipation and the first forkful never get old. It’s a simple pleasure that keeps pulling me back into the kitchen.

Hi, I’m Theo Granger, the voice and recipe creator behind Boldly Overseasoning.
If you believe salt is not the enemy, spices should be generous, and flavor should never whisper when it can sing, then you are absolutely in the right place. Boldly Overseasoning is my unapologetic celebration of big flavor, confident cooking, and trusting your instincts in the kitchen. I created this space for people who are done with bland food and ready to cook with courage.


Leave a Reply