Focusing on the tactile experience of scallops—the way their surface crisps and their interior remains tender—this recipe emphasizes the sensory journey from raw ingredient to perfectly seared bite, making the process as satisfying as the result.
There’s a quiet joy in hearing that first crackle as the scallops hit the hot pan, knowing that in just minutes you’ll have a golden crust and that delicate, sweet interior. It’s about honing in on that moment, making each step feel almost meditative while still straightforward enough for a weeknight treat.
Seared scallops are a dance of textures, a simple pleasure that rewards your attention. The process is honest—no tricks, just a good pan, good heat, and a little patience to coax out their best.
Focusing on the tactile experience of scallops—the way their surface crisps and their interior remains tender—this recipe emphasizes the sensory journey from raw ingredient to perfectly seared bite, making the process as satisfying as the result.
The tactile joy of searing
- I love the instant gratification of hearing that satisfying sizzle as the scallops hit the hot pan, signaling dinner is on.
- There’s a nostalgic rush in perfecting that golden, caramelized crust—reminds me of cooking with my grandma in her small kitchen.
- The delicate, almost sweet aroma that fills the room when searing scallops makes me feel like I’ve captured a moment of pure, simple luxury.
- Nothing beats the pride of flipping those scallops just right, watching their edges turn crisp while the insides stay tender and juicy.
The tactile joy of searing
- Seared scallops remind me of a tiny seaside vacation, even if I’m just in my kitchen. That moment when the pan hits hot and the smell of browning shellfish fills the air—there’s a kind of magic in that simple act.
- I started playing with scallops years ago, trying to get that perfect golden crust without overcooking the inside. It’s a balance, like a mini science experiment, but when it clicks, it’s so satisfying.
- This dish is more than just a quick sear; it’s a mindful pause. A chance to slow down, focus on the textures and flavors, and enjoy the process as much as the bite.
Contextual origin, trivia, or history
- Pan-searing scallops became popular in French cuisine, especially in coastal regions where fresh shellfish was abundant.
- In the 20th century, scallops gained popularity in American seafood restaurants, symbolizing upscale, quick-cook elegance.
- The technique of searing shellfish like scallops is believed to have originated from traditional European fish-cooking methods, emphasizing browning for flavor.
- Scallops are part of the mollusk family, with a history dating back thousands of years, often considered a delicacy since ancient times.
- The term ‘scallop’ comes from the Old French ‘escalope,’ referring to the shell’s distinctive fan shape, which has inspired many culinary presentations.
Ingredient breakdown
- Scallops: I look for plump, dry scallops with a firm texture—make sure they’re not slimy or overly moist. You want that quick, dry surface for a perfect sear.
- Salt: I season just before searing, using coarse sea salt to enhance their natural sweetness—skip early salting to avoid drawing out moisture.
- Oil: I prefer a high-smoke-point oil like canola or grapeseed—watch for that shimmering start, it’s your cue to lay down the scallops.
- Butter: I add a small knob at the end for richness, but I start with oil; butter burns quickly, so it’s best during the last minute for a glossy finish.
- Lemon: I squeeze fresh lemon juice over right after searing—brightens the flavor and cuts through that buttery richness with a zing.
- Pepper: I use freshly cracked black pepper, but feel free to swap for white pepper for a subtler heat—just don’t skip it, it adds a nice contrast.
- Herbs: I like a sprinkle of chopped parsley or thyme—fresh herbs brighten the plate and add a subtle aromatic lift, especially if you’re serving immediately.
Spotlight on key ingredients
Scallops:
- I look for plump, dry scallops with a firm texture—make sure they’re not slimy or overly moist. You want that quick, dry surface for a perfect sear.
- Salt: I season just before searing, using coarse sea salt to enhance their natural sweetness—skip early salting to avoid drawing out moisture.
Oil & Lemon:
- Oil: I prefer a high-smoke-point oil like canola or grapeseed—watch for that shimmering start, it’s your cue to lay down the scallops.
- Lemon: I squeeze fresh lemon juice over right after searing—brightens the flavor and cuts through that buttery richness with a zing.
Notes for ingredient swaps
- Seafood Alternatives: Use firm fish fillets like halibut or monkfish if scallops are unavailable. They won’t sear as quickly but still develop a lovely crust.
- Oil Choices: Swap canola or grapeseed oil for avocado oil if you prefer a milder flavor. Just ensure it has a high smoke point to prevent burning.
- Butter: Use clarified butter or ghee for a nutty flavor with a higher smoke point. Regular butter adds richness but can burn faster.
- Lemon: Lime or vinegar can replace lemon for acidity, but lemon’s bright, citrusy note is hard to match exactly.
- Herbs: Fresh tarragon or basil can substitute parsley or thyme for a different aromatic twist. Use sparingly as their flavors are more pronounced.
- Salt: Fine sea salt can be replaced with kosher salt, just adjust the quantity slightly to avoid oversalting.
- Pepper: White pepper offers a milder, more subtle heat; black pepper gives a more robust bite. Use based on your preference.
Equipment & Tools
- Heavy skillet (cast iron preferred): Provides even heat for a crisp sear.
- Tongs or fish spatula: For flipping scallops gently.
- Paper towels: To dry scallops thoroughly for optimal browning.
- Small bowl for lemon juice: For quick addition of acidity after searing.
Step-by-step guide to pan searing
- Equipment & Tools: Gather a heavy-bottomed skillet (preferably cast iron), a fish spatula or tongs for flipping, a small bowl for lemon juice, and paper towels for dry scallops.
- Pat the scallops dry with paper towels—moisture is the enemy of a good sear. Make sure they’re dry and at room temp, about 10 minutes out of the fridge.
- Season the scallops generously with coarse sea salt just before cooking. Avoid salting too early or they’ll release moisture.
- Heat the skillet over medium-high heat until it’s shimmering—about 2-3 minutes. Add a tablespoon of high-smoke-point oil, swirl to coat.
- Place the scallops in the hot pan, spacing them apart. They should sizzle immediately. Don’t overcrowd; work in batches if necessary.
- Step 5a: Sear without moving for about 2 minutes. Watch for a golden crust to form around the edges. If they’re sticking, give them another 30 seconds and check again.
- Step 5b: Flip the scallops carefully with tongs or a spatula. Cook for another 1-2 minutes until the other side is golden and the center is just opaque.
- During the last 30 seconds, add a small knob of butter and a squeeze of lemon juice to the pan. Tilt the pan and spoon the butter over the scallops for a shiny, flavorful coat.
- Rest & Plate: Remove scallops from the pan and let rest for 1 minute. Plate immediately, spooning over any pan juices and herbs if using.
- Checkpoints & How to Know It’s Done: Look for a golden crust, edges that are crisp, and a firm, slightly springy texture. The center should be opaque but not rubbery.
Remove scallops onto a plate, drizzle with pan juices, and sprinkle with fresh herbs if desired. Rest for 1 minute to allow juices to settle before serving.
How to Know It’s Done
- Golden, caramelized crust on each scallop.
- Edges are crisp while interior is tender and opaque.
- Internal temperature reaches 50–55°C (122–131°F) for perfect doneness.
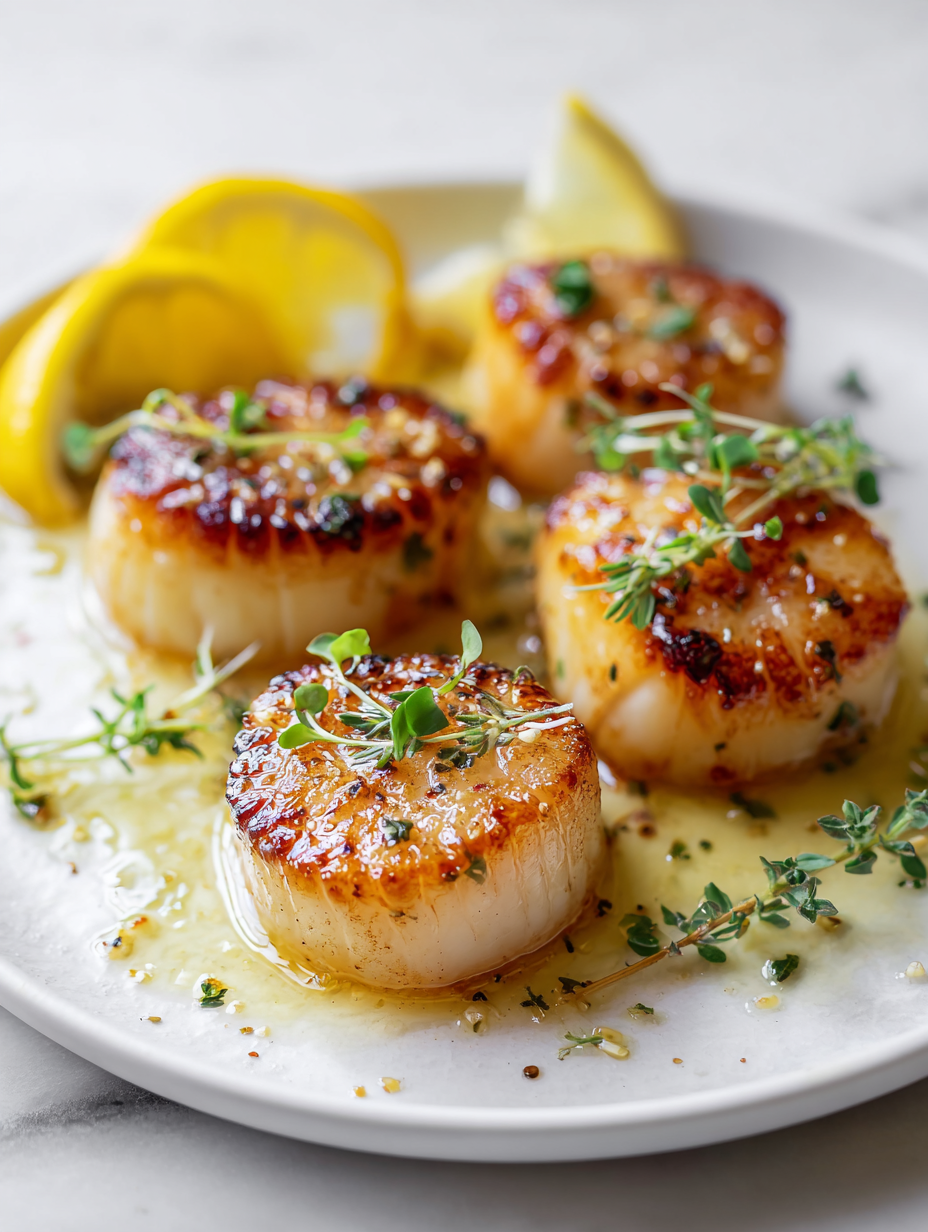
Perfectly Seared Scallops
Ingredients
Equipment
Method
- Pat the scallops dry thoroughly with paper towels to remove excess moisture, which helps achieve a good sear. Let them sit at room temperature for about 10 minutes.
- Sprinkle the scallops generously with coarse sea salt just before cooking. This enhances their natural sweetness and flavor.
- Heat a heavy skillet over medium-high heat until shimmering, about 2-3 minutes. Add the oil and swirl to coat the pan evenly.
- Gently place the scallops into the hot pan, spacing them apart to avoid overcrowding. You should hear an immediate sizzle.
- Allow the scallops to sear without moving them for about 2 minutes, watching them develop a deep golden-brown crust around the edges.
- Carefully flip each scallop using tongs or a fish spatula, then cook for another 1-2 minutes until the other side is also golden and the scallops are just opaque inside.
- During the last 30 seconds of cooking, add a small knob of butter and squeeze fresh lemon juice into the pan. Tilt the pan and spoon the buttery mixture over the scallops for extra richness and shine.
- Remove the scallops from the pan and let them rest for about 1 minute. Garnish with chopped parsley or thyme for a fresh aromatic touch.
- Serve immediately, spooning any pan juices over the scallops for added flavor, and enjoy the crispy exterior with tender, juicy insides.
Notes
Pro tips for perfect scallops
- Dry scallops thoroughly: Pat them with paper towels until no moisture remains for a crisp sear.
- Use high heat: Preheat your pan until shimmering—this quickens browning and prevents sticking.
- Don’t overcrowd: Sear in batches if needed; too many scallops will lower the pan temperature and cause steaming.
- Lay them gently: Place scallops away from you in the pan to avoid splatters and ensure even contact.
- Resist flipping early: Wait for a golden crust—about 2 minutes—before flipping for maximum caramelization.
- Finish with butter and lemon: Add at the end for richness and brightness, spooning over the scallops for shine and flavor.
- Rest briefly: Let scallops sit for 1 minute after cooking to settle juices and maintain tenderness.
Common mistakes and how to fix them
- FORGOT to dry scallops thoroughly → they won’t sear properly; pat dry with paper towels.
- DUMPED oil into cold pan → heat the pan first, then add oil to prevent sticking and splatter.
- OVER-TORCHED the scallops → reduce heat and cook in smaller batches for even searing.
- UNDER-SEARED scallops → cook until they develop a deep golden crust, about 2 minutes per side.
Quick fixes and pantry swaps
- When scallops stick, splash a little water in the pan and let crackling subside.
- If scallops are rubbery, overcooked — rescue with a quick squeeze of lemon and a buttered finish.
- Damp scallops cause steaming, so pat dry thoroughly before searing.
- When oil shimmers, gently place scallops away from you to prevent splatters.
- Patch over with a bit of extra seasoning or a squeeze of lemon if flavor dulls after resting.
Prep, store, and reheat tips
- Prep the scallops by thoroughly drying them with paper towels the day before—this ensures maximum crispness during searing.
- Store cleaned and dried scallops tightly wrapped in plastic in the fridge for up to 24 hours; avoid freezing raw scallops to prevent texture loss.
- Season the scallops just before cooking; seasoning too early can draw out moisture, making searing less effective.
- Reheat seared scallops gently in a warm skillet over low heat—just enough to warm through without losing their tender texture; watch for a gentle shimmer and slight aroma of butter and lemon.
- For leftovers, store in an airtight container in the fridge for up to 1 day; reheat briefly, and expect a slightly softer texture, with the crust absent after reheating.
Top questions about pan seared scallops
1. Should scallops be dry before cooking?
Use dry, fresh scallops that are firm and not slimy. Pat them completely dry before searing to get a crisp crust.
2. How hot should the pan be before adding scallops?
Heat your pan until shimmering before adding oil. This helps prevent sticking and promotes even browning.
3. How long do I cook scallops on each side?
Sear scallops for about 2 minutes per side until they develop a deep golden crust and are just opaque inside.
4. When should I add butter and lemon?
Add butter and lemon juice during the last 30 seconds of cooking to finish with richness and brightness.
5. What if my scallops stick to the pan?
If scallops stick, splash a little water in the pan and wait for crackling to subside before flipping.
6. How do I know when scallops are done?
Overcooked scallops become rubbery; remove them as soon as they turn opaque and develop a golden crust.
7. How should I flip scallops without breaking them?
Use a fish spatula or tongs to flip scallops gently. Avoid overcrowding to maintain high heat.
8. Should I rest scallops after searing?
Rest scallops for about 1 minute after cooking to allow juices to settle and keep them tender.
9. Can I reheat seared scallops?
Reheat leftovers gently in a warm skillet over low heat just until warmed through, about 2 minutes.
10. Can I substitute lemon juice?
Fresh lemon brightens the flavor, but lime or a splash of vinegar can work if you’re out of lemon.
Searing scallops is a small, satisfying act—like capturing a fleeting moment of perfection in your kitchen. When you hear that initial crackle and see the rich, golden crust form, it’s almost a quiet celebration of good technique and fresh ingredients.
This simple dish reminds me how much pleasure lies in the details—patience, heat, and a quick squeeze of lemon. It’s a reminder that sometimes, the most straightforward methods produce the most memorable bites.
Hi, I’m Theo Granger, the voice and recipe creator behind Boldly Overseasoning.
If you believe salt is not the enemy, spices should be generous, and flavor should never whisper when it can sing, then you are absolutely in the right place. Boldly Overseasoning is my unapologetic celebration of big flavor, confident cooking, and trusting your instincts in the kitchen. I created this space for people who are done with bland food and ready to cook with courage.

Leave a Reply